Cloud Native Buildpacks: How to Create a Custom Buildpack

The buildpack structure
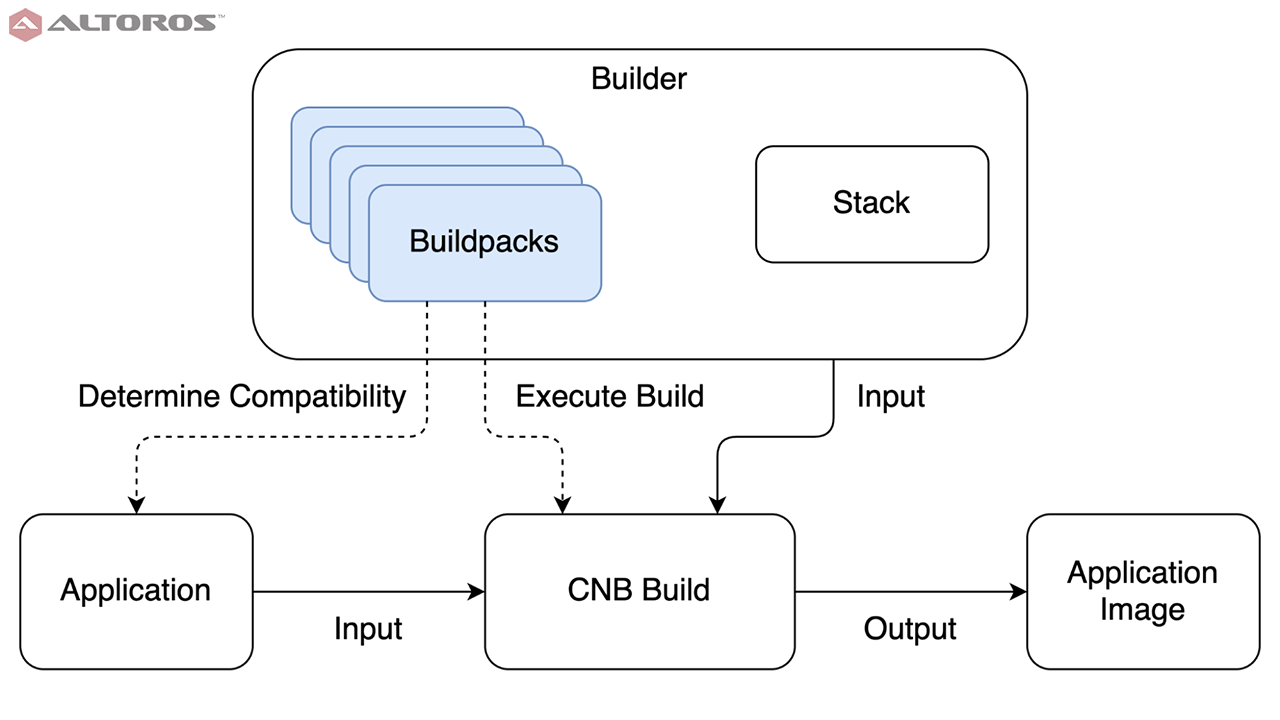
Now that we’ve seen the benefits of the Cloud Native Buildpack framework and created a stack, it’s time to build on the stack functionality by adding a buildpack to our example repository. The buildpack defines and executes the process of creating the final application image, and does so within the build image from the stack. Building the application image happens in two phases.
First, the buildpack examines the application and determines whether it applies. If it does, the buildpack then consumes the application as input and executes the CNB build, producing the application image as output.
 The buildpack’s place in the CNB process
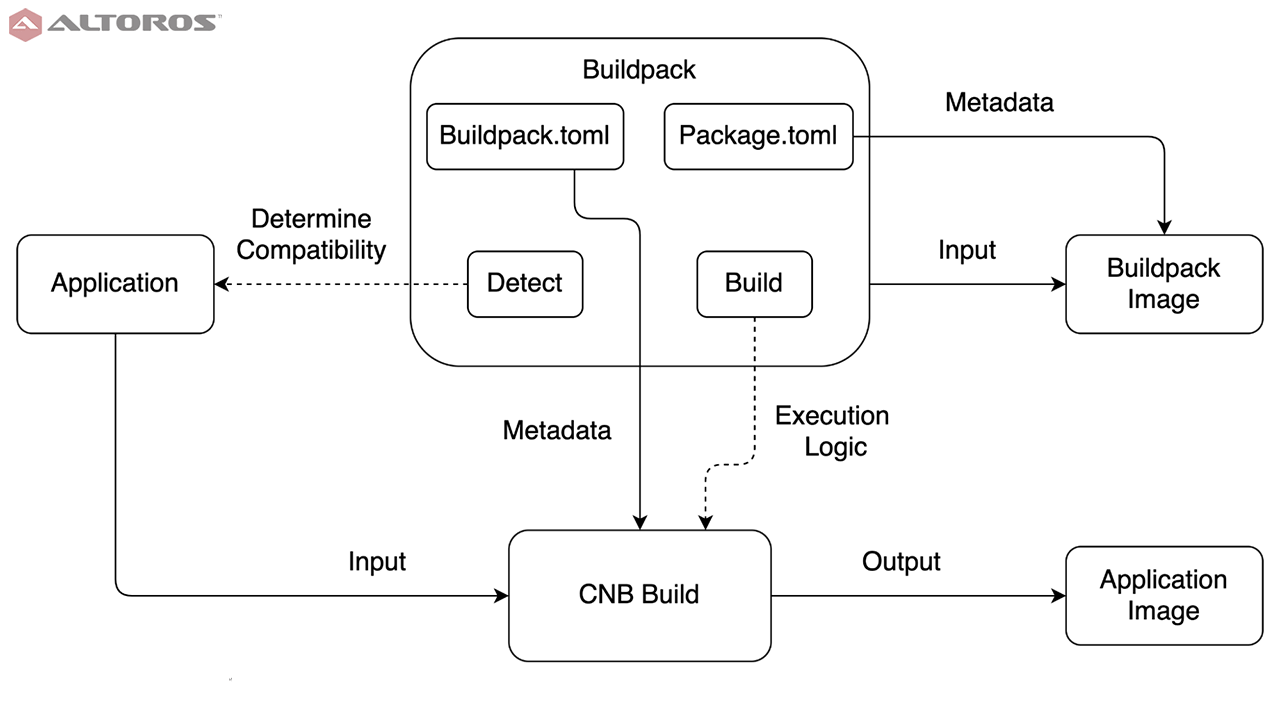
The buildpack is the workhorse of the CNB framework. It’s responsible for taking the application source code or a compiled binary and producing a runnable application image. Consequently, it is also the most technically complex component.
A buildpack consists of four parts:
detect: a script that determines if the buildpack applies to an applicationbuild: a script that performs the image buildingbuildpack.toml: a configuration file defining metadatapackage.toml: an optional configuration file that packages the buildpack itself into a Docker image
 The structure and the use of a CNB buildpack
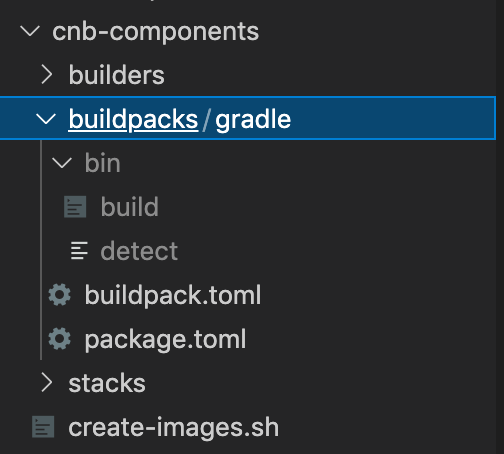
The file structure of the buildpack is important. For our example, the buildpack will need to consume the sample Spring Boot application, which is built with Gradle, so the files are in cnb-components/buildpacks/gradle. A buildpack must have a buildpack.toml file, which is a markup language similar to YAML. The CNB framework leverages TOML files in a number of places to define image layers, specify metadata, and supply configuration. In the same directory, it requires a bin folder containing two executable bash scripts, detect and build. A package.toml file is needed to encapsulate the buildpack into a Docker image, though doing so is not required to build application images.
 Buildpack-related files in the sample repository
Detect
A buildpack applies to a particular application build technology: Gradle, Maven, Node, Python, and so on, rather than a particular application or code language. Consequently, the buildpack must be able to determine whether the application input is compatible with the specified build process. The detect script makes this determination.
1 2 3 4 5 6 7 | #!/usr/bin/env bash set -eo pipefail # Check if applicable: must have gradle wrapper file if [[ ! -f ./gradlew ]]; then exit 100 fi |
In this case, the check is quite simple: if there is a Gradle wrapper file, then the Gradle buildpack applies. If not, the exit 100 code tells the CNB framework this buildpack is not compatible with the specified application.
The detect script also handles dependency metadata, specifying what the buildpack requires and provides.
1 2 3 4 5 6 7 8 9 10 11 12 13 14 | # Passed in args plan_path=$2 # Declare dependencies cat >> "${plan_path}" <<EOL # Provided dependencies [[provides]] name = "jdk" # Required dependencies [[requires]] name = "jdk" EOL |
The argument is supplied at build execution time by the CNB framework, and specifies a path to a TOML file containing the dependency information. It’s important to understand how TOML files are used by the CNB process. When creating an image, a directory with a TOML file defines a single layer in the output image, just like a single command in a Dockerfile. The cat >> "layerdir/layer.toml" <<EOL ... EOL code defines the content of the TOML file to be everything written in the script—the dependency information, in this case—until EOL is reached. This pattern of constructing TOML files (which define image layers) dynamically is used throughout the CNB components.
For our purposes, this buildpack both requires and provides a JDK to build the application. Dependencies can be fulfilled by either the current buildpack, or a previous one. Multiple buildpacks can apply to a single CNB build; more on this in the builder deep dive. However, buildpack dependencies are separate from stack dependencies. For example, it would be a mistake to declare this buildpack as requiring wget, even though we installed it in our stack’s build image.
Keeping the concerns of stacks (OS level definitions) and buildpacks (tech stack level definitions) cleanly separated greatly reduces the work necessary to make CNB components cross platform. Imagine needing both Linux and Windows application images, and having Node.js, Java, Python, and Ruby applications to deploy. Instead of writing eight components (one for each combination of OS and tech stack), only six are required (one for each piece of any sort).
The framework then combines them at CNB build time. This type of cross-platform effort reduction is the same strategy behind the just in time compilation of the .NET Framework and JVM, where an intermediate transformation layer (source code to byte code to machine instructions) greatly reduces the number of combinations (source code language paired with machine architecture) the language maintainers must implement.
Build
The build script, besides creating the application image, is responsible for providing any dependencies that the detect script commits to. Remember that the build happens within the build image specified by the stack. Whether a dependency should be provided by the stack or buildpack depends on its scope. Components that are tech stack agnostic and should always be included, such as OS level libraries, belong in the stack. Ones which are specific to a language or ecosystem, such as a JDK, belong in the buildpack.
Similar to detect, build is a bash script, and it starts in the same manner.
1 2 3 4 5 6 7 8 9 10 | #!/usr/bin/env bash set -eo pipefail echo "---> Gradle buildpack" # Ingest args layers_dir="$1" env_dir="$2/env" plan_path="$3" |
Again, the arguments will be passed in automatically by the CNB framework, and they serve the same function, setting paths for necessary files. The framework also has the ability to set environment variables in the build context, which need to be parsed by the build script.
1 2 3 4 5 6 7 | # Set user provided env vars if compgen -G "${env_dir}/*" > /dev/null; then for var in ${env_dir}/*; do declare "$(basename ${var})=$(<${var})" done fi |
While we won’t be using any environment variables in the example, this is a very useful feature. These environment variables can be set in the command that initiates the CNB build, and thus a buildpack could be written to, for example, stamp the application image with audit trail information, or embed secrets with values hidden from the application development team.
This buildpack needs a JDK. For example purposes, we use the AdoptOpenJDK version 11. This code will download, install, and package the JDK into a reusable layer in the image. There’s a lot going on here, so we’ll examine it line by line. First, setting some local variables will keep the script clean.
1 2 3 | jdk_url="https://github.com/AdoptOpenJDK/openjdk11-binaries/releases/download/jdk-11.0.11%2B9_openj9-0.26.0/OpenJDK11U-jdk_x64_linux_openj9_11.0.11_9_openj9-0.26.0.tar.gz" jdk_version="1.11.0_11" jdk_layer_dir=${layers_dir}/jdk |
If the JDK layer already exists, use it, or fail the build if it is corrupted. Note the use of the yj and jq packages installed in the build image of our stack.
1 2 3 | if [[ -f ${jdk_layer_dir}.toml ]]; then cached_jdk_url=$(cat "${jdk_layer_dir}.toml" | yj -t | jq -r .metadata.url 2>/dev/null || echo 'JDK TOML parsing failed') fi |
If the layer does not exist, then download the JDK…
1 2 3 4 | if [[ ${jdk_url} != ${cached_jdk_url} ]] ; then rm -rf "$layers_dir"/jdk mkdir -p "$layers_dir"/jdk/env wget -q -O - "$jdk_url" | tar pxz -C "${jdk_layer_dir}" --strip-components=1 |
…and cache it as a layer in the image. Remember, the cat…EOF pattern is used to create TOML files, so the unindented lines are the literal file text, not code that the script executes. Buildpacks also support the ability to install local files in the buildpack’s directory, rather than pulling a dependency over the network.
1 2 3 4 5 6 7 8 | cat > "${jdk_layer_dir}.toml" << EOF launch = true build = true cache = true [metadata] version = "${jdk_version}" url = "${jdk_url}" EOF |
Now that the JDK is installed on the disk, set up the necessary environment variables for the OS to use it, and include this in the JDK layer’s cache.
1 2 3 4 5 6 7 8 9 10 11 12 13 14 15 16 17 | echo "$layers_dir"/jdk > "$layers_dir"/jdk/env/JAVA_HOME if [[ -z ${LD_LIBRARY_PATH} ]]; then echo "${JAVA_HOME}/jre/lib/amd64/server" > ${jdk_layer_dir}/env/LD_LIBRARY_PATH else echo "${JAVA_HOME}/jre/lib/amd64/server:${LD_LIBRARY_PATH}" > ${jdk_layer_dir}/env/LD_LIBRARY_PATH fi mkdir -p ${jdk_layer_dir}/profile.d cat > "${jdk_layer_dir}/profile.d/jdk.sh" << EOF export JAVA_HOME=${jdk_layer_dir} if [[ -z \$LD_LIBRARY_PATH ]]; then export LD_LIBRARY_PATH="\$JAVA_HOME/jre/lib/amd64/server" else export LD_LIBRARY_PATH="\$JAVA_HOME/jre/lib/amd64/server:${LD_LIBRARY_PATH}" fi EOF fi # if [[ ${jdk_url} != ${cached_jdk_url} ]] ; then |
Now that the JDK is ready to use, add it to the OS’s path, so it can be called:
1 2 3 4 | for var in "${layers_dir}"/jdk/env/*; do declare "$(basename "$var")=$(<"$var")" done export PATH=${jdk_layer_dir}/bin:$PATH |
Why go to the trouble of creating and managing these layers? It would be much simpler to have a static JDK file embedded in the buildpack image and not worry about caching. The answer is scale. Imagine a major enterprise with hundreds of apps with a rapid, continuous delivery life cycle. This could require hundreds of builds a day. A reusable cache drastically lowers the amount of time required, and breaking the caching strategy out by image layers means that, for example, the JDK install only needs to be done once. The same layer gets reused for every build until the JDK needs to be updated, thanks to the CNB framework’s rebase functionality.
Similarly, we create a Gradle layer (to cache the application’s build time dependencies) and then execute the build.
1 2 3 4 5 6 7 8 9 | gradle_layer_dir="${layers_dir}/gradle" if [[ ! -d ${gradle_layer_dir} ]]; then mkdir -p ${gradle_layer_dir} echo "cache = true" > ${gradle_layer_dir}.toml fi ln -s ${gradle_layer_dir} $HOME/.gradle echo "---> Running Gradle build" ./gradlew clean build -x test --no-daemon |
The final piece needed in the build is to define a default start-up command for the application image. This is not strictly necessary, as the Docker daemon allows for passing in commands when starting containers, but is an important best practice. This too involves creating a layer in the image. The name of this layer is always launch.toml by the CNB convention.
1 2 3 4 5 6 7 8 9 10 11 12 13 14 | echo "---> Creating start-up command" target_dir="build/libs" for jar_file in $(find "$target_dir" -maxdepth 1 -name "*.jar" -type f); do cat >> "${layers_dir}/launch.toml" <<EOL [[processes]] type = "web" command = "java -jar ${jar_file}" [[bom]] name = "gradle" [bom.metadata] version = "0.0.1" EOL break; done |
In addition to declaring this image should use the installed JDK to run the built jars on initialization, this code defines the image’s bill of materials. The BOM records the start-up commands, as well as metadata about the image, which can be any set of key-value pairs that your organization desires.
The build script is the most complex piece of the most complex CNB component. If it feels like a lot to take in, don’t worry, the complexity is all downhill from here.
Buildpack.toml
The buildpack.toml file sits at the root of the buildpack’s directory. It declares CNB framework level information, such as CNB API version, buildpack ID, and compatible stacks.
1 2 3 4 5 6 7 8 9 10 11 12 13 | # Buildpack API version api = "0.2" # Buildpack ID and metadata [buildpack] id = "altoros/gradle" version = "0.0.1" name = "Sample Gradle Buildpack" homepage = "https://github.com/Altoros/cn-buildpacks-example/tree/master/cnb-components/buildpacks/gradle" # Eligible stacks [[stacks]] id = "com.altoros.demo.cnb.stacks.ubuntu" |
While all of this information is required, it does not necessarily mean that buildpack authors must also write stacks. One of the great things about the CNB framework is the public component registry and composability of the components. This allows buildpack authors to leverage proven, existing stacks for free. A buildpack can also be marked as compatible with many different stacks by adding additional [[stacks]] id = "..." entries.
This is also where, optionally, authors can specify metadata about the buildpack, such as version, included dependencies, and so forth.
1 2 3 4 5 6 | [[metadata.dependencies]] id = "jdk" name = "AdoptOpenJDK" version = "1.11.0_11" uri = "https://github.com/AdoptOpenJDK/openjdk11-binaries/releases/download/jdk-11.0.11%2B9_openj9-0.26.0/OpenJDK11U-jdk_x64_linux_openj9_11.0.11_9_openj9-0.26.0.tar.gz" stacks = [ "com.altoros.demo.cnb.stacks.ubuntu" ] |
This indicates the buildpack provides a JDK, its particulars, and which eligible stacks will include this dependency. Unlike the previous entries, metadata here is for the benefit of the people using CNB; it is not used by the framework to determine compatibility.
Package.toml
The package.toml file is consumed by the CNB framework when building an image of the buildpack itself. While it is possible to use the buildpack source code directly to produce application images, best practice is to package buildpacks, to ensure consistency, publish to third parties, and make distributed builds simpler.
For our purposes, the file itself is quite straightforward.
1 2 | [buildpack] uri = "." |
These are the only two required fields: a declaration of a buildpack, and a URI specifying the buildpack’s root folder (buildpacks/gradle in our example), relative to package.toml. However, there are a substantial number of optional fields available in the file’s CNB framework schema useful for cataloguing or advanced framework features.
One buildpack feature mentioned previously but not coded is the ability to compose multiple buildpacks. Not only can multiple buildpacks execute in sequence as part of the same build, it’s also possible to create a buildpack which is composed of other buildpacks. For example, a general Java buildpack could be composed of variations on the buildpack we just wrote, each with a different JDK. Experimenting with multiple buildpacks is left as an exercise to the reader, but the CNB documentation has excellent examples.
Building the images
Now that the buildpack is finished, let’s verify that it works. From the root of the example repository, run:
1 | pack build altoros/verify-buildpack-image --buildpack ./cnb-components/buildpacks/gradle |
This runs a CNB build of the sample application using the new buildpack. If you receive an error message about a default builder, set it to the Paketo community builder with:
1 | pack config default-builder paketobuildpacks/builder:base |
As previously mentioned, it’s possible to use buildpacks directly from their source files, rather than as packaged images. This is handy for buildpack authors to verify and test their work, though is not a suitable practice for production processes. When the build succeeds, you should have a new Docker image to run and test, named altoros/verify-buildpack-image.
Now that we have confirmed the buildpack works as expected, let’s package it into a Docker image. From the buildpack’s root folder (cnb-components/buildpacks/gradle):
1 | pack buildpack package altoros/buildpack:gradle --config ./package.toml |
For convenience, the example repository includes the packaging as part of create-images.sh in the CNB components folder. The buildpack is now ready for distribution and inclusion in a builder, which is coming next.
Writing a buildpack may seem intimidating, but it does not need to be difficult or complex. On the other hand, the ability to write custom detect and build scripts offers a great deal of flexibility and depth, allowing CNB to shine in complex or mixed technology environments. In the final post of this series, we’ll create a builder and consume this buildpack to generate an image for the sample application.
More in this series
- Cloud Native Buildpacks: Streamlining the Creation of Docker Images
- Cloud Native Buildpacks: Creating a Stack for Custom Components
- Cloud Native Buildpacks: How to Create a Custom Builder