Cloud Native Buildpacks: Creating a Stack for Custom Components

Why create custom buildpack components?
Cloud Native Buildpacks (CNB) provide a strong value proposition in terms of both industry trends and process advantages. In the previous post, we wrote how buildpacks help to streamline the creation of Docker images.
While the community-provided framework components are excellent, it’s not always feasible or wise to rely entirely on third-party tools for builds. Third-party tools can change, vanish, or end support without warning. Security requirements may preclude pulling arbitrary images from the Internet or mandate everything be developed in-house.
In addition to preventing potential problems, building your own components offers a number of advantages. Need to ensure every application image runs on the same base operating system with the same set of packages installed, or that your internal SSL certificates are present? Custom CNB components are a tidy way to accomplish that.
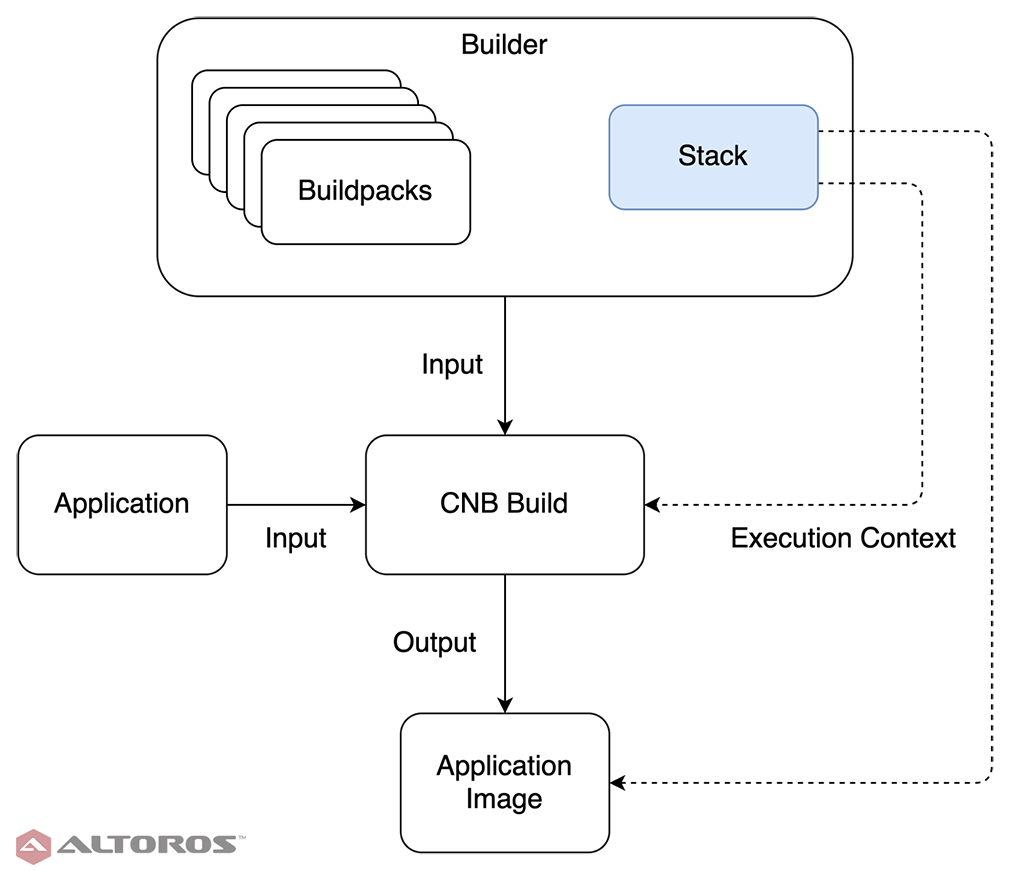 The stack’s place in the CNB process
There are three major pieces to the CNB process. Stacks define the images for building and running the app. Buildpacks are tech stack–specific and perform the application build. Builders combine stacks and buildpacks to create the fundamental CNB unit of work. In this tutorial, we get familiar with the CNB toolchain and create a stack. The upcoming two parts of this series will consume the stack during creation of a buildpack and builder. All of the code referenced here is available in our GitHub repo.
The toolchain
The Cloud Native Buildpack framework is very lightweight. It has only three requirements for use:
- The Docker runtime.
- The pack CLI tool (or kpack if the image building is done within a Kubernetes environment; the commands and features are the same).
- Components must adhere to the the CNB specification (don’t worry, it does not require reading).
Both prerequisite tools are multiplatform, and the CNB outputs are Docker images at each step, making everything highly portable and cloud provider–agnostic. Simply install Docker and pack, and you’ll be ready to go!
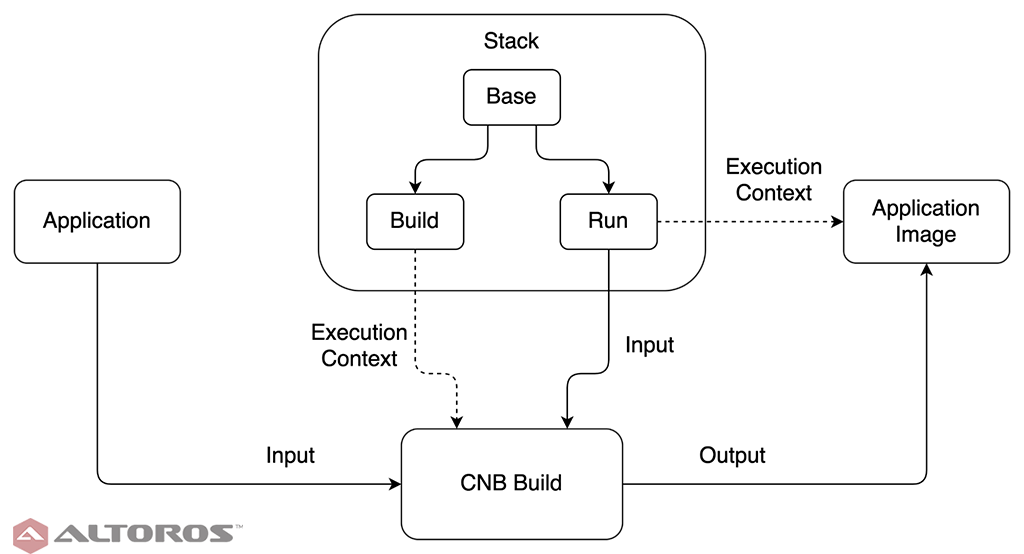
The stack
A stack is simply a set of Docker images that get consumed by the CNB framework when building app images. The stack controls the environment for both running the app and the CNB build process. A stack has three parts: a base image, a build image, and a run image. The build and run images extend the base image. This is in line with the best practice principles of DRY, as well as twelve-factor number five: separating the building and running of an app. The CNB build process happens within the build image, and the run image is used as the base for the final app image.
 The structure and use of the CNB stack
Since all three pieces of the stack are related Docker images, this is an excellent scenario for Docker multistage builds, allowing all three images to be cleanly defined in a single Dockerfile. All of the code comes from our example stack. We’ll go through it sequentially.
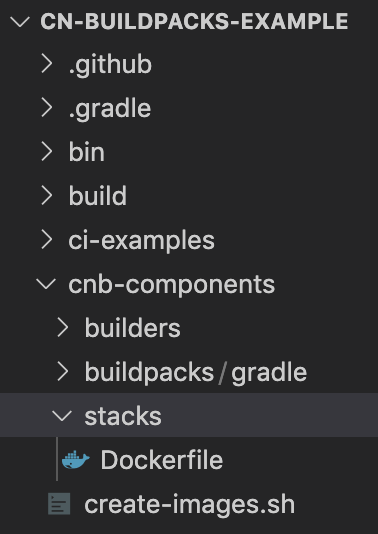 Stack-related files in the example repository
The base image
Exactly as you would expect from the name, a base image contains the underlying basic infrastructure and defines the layers common to both the build and run environments.
The first line is straightforward for anyone familiar with Dockerfiles: FROM ubuntu:bionic as base. This declares the definition of an image named base, which runs Ubuntu’s Bionic Beaver edition.
Each stack needs an identifier. This is used by the CNB framework to determine compatibility among components, for example, matching the build and run images of a stack, or stack eligibility to use with a particular buildpack.
1 2 | ENV CNB_STACK_ID="com.altoros.demo.cnb.stacks.ubuntu" LABEL io.buildpacks.stack.id="com.altoros.demo.cnb.stacks.ubuntu" |
Defining both the environment variable and label is required. The CNB framework is configured by both environment variables and image labels. It uses the variables within executing containers and image labels in the host build environment. It’s also important to make sure these have the same value. While the demo is hardcoded for simplicity, a good process improvement in a CI environment would be passing this value in as an ARG.
The CNB framework executes commands during image building as a specified user rather than the Docker default of root. In fact, it is expressly forbidden to use any root level user for CNB purposes. This improves the security and helps prevent permissions problems within the final application image.
1 2 3 4 | ENV CNB_USER_ID=1000 ENV CNB_GROUP_ID=1000 RUN groupadd cnb --gid ${CNB_GROUP_ID} && \ useradd --uid ${CNB_USER_ID} --gid ${CNB_GROUP_ID} -m -s /bin/bash cnb |
The ID values themselves are not important, as long as they don’t collide with any others.
All the previous steps were required, but this one is optional: install any packages, files, or dependencies that should be available during both image building and app execution.
1 2 3 | RUN apt-get update && \ apt-get install -y xz-utils ca-certificates && \ rm -rf /var/lib/apt/lists/* |
Here, we install the latest version of two core utility packages, then wipe the package manager’s cache. Chaining these three commands together creates a single layer in the Docker image. Capturing the package manager output and leaving its cache in the final image is wasteful and unnecessary.
The build image
So far, so good. Now, it’s time to consume the base image just defined to produce the build image. This specifies the environment that the CNB build process executes in. To put it another way, the final app images will be built inside of a container running this build image. Docker-in-Docker sounds complex, but the CNB framework abstracts all of this away, so creating a build image is actually quite easy.
Just as before, we start with defining a new image that extends another, base as previously defined in this case.
1 | FROM base as build |
Similarly, we also want to install packages that should be available during the CNB build process.
1 2 3 4 5 | RUN apt-get update && \ apt-get install -y git wget jq && \ rm -rf /var/lib/apt/lists/* && \ wget https://github.com/sclevine/yj/releases/download/v5.0.0/yj-linux -O /usr/local/bin/yj && \ chmod +x /usr/local/bin/yj |
We will be using these packages later when creating a buildpack.
Something that is optional is declaring the mixin packages, which the image provides. These are preinstalled operating system dependencies that the image guarantees as available. The CNB components have the ability to declare and check dependencies to ensure compatibility.
1 | LABEL io.buildpacks.stack.mixins="[\"build:wget\", \"build:jq\", \"build:yj\"]" |
The value of this setting is a JSON list specifying the provided mixin package names. Prefixing the package with build: or run: specifies that the dependency is only available during that stage. No prefix means it is available at both build and run time. Here, we mark the three packages we’ve just installed as available at build time.
Finally, we set the active user for the image employing the environment variables declared in the base image.
1 | USER ${CNB_USER_ID}:${CNB_GROUP_ID} |
It’s important to do this after installing the additional packages to ensure the install succeeds.
The run image
The counterpart to the build image, the run image is consumed by the CNB build process to host the built app. This is the base image that will end up being deployed to production.
1 2 | FROM base as run USER ${CNB_USER_ID}:${CNB_GROUP_ID} |
In this case, our run image is exceedingly simple. We have no additional dependencies to add or mixins to declare, so all that remains is to set an active user. Remember, we could not do so in the base image, because the build image needed to install additional dependencies, so this image definition is not superfluous.
Building the images
Now that we have defined the images comprising the stack, it’s time to build them. From the same directory as the Dockerfile, run the command below.
1 2 | docker build . -t altoros/build-image:ubuntu --target build docker build . -t altoros/run-image:ubuntu --target run |
This creates and tags both images using the --target option to choose the appropriate stage. For convenience, the demo repository has a script that will build all the images at once.
In a robust CI environment, these images should be published to the appropriate image repo, then pulled down as needed. However, for our purposes, the stack is finished and ready to be consumed by other CNB components.
For full code samples, check out this GitHub repository.
Creating a stack is very straightforward, and already we can see opportunities for improving the process and standardization when building application images. In the next blog post in this series, we’ll create a buildpack based on this stack.
More in this series
- Cloud Native Buildpacks: Streamlining the Creation of Docker Images
- Cloud Native Buildpacks: How to Create a Custom Buildpack
- Cloud Native Buildpacks: How to Create a Custom Builder