Cloud Native Buildpacks: How to Design a Custom Builder

The builder
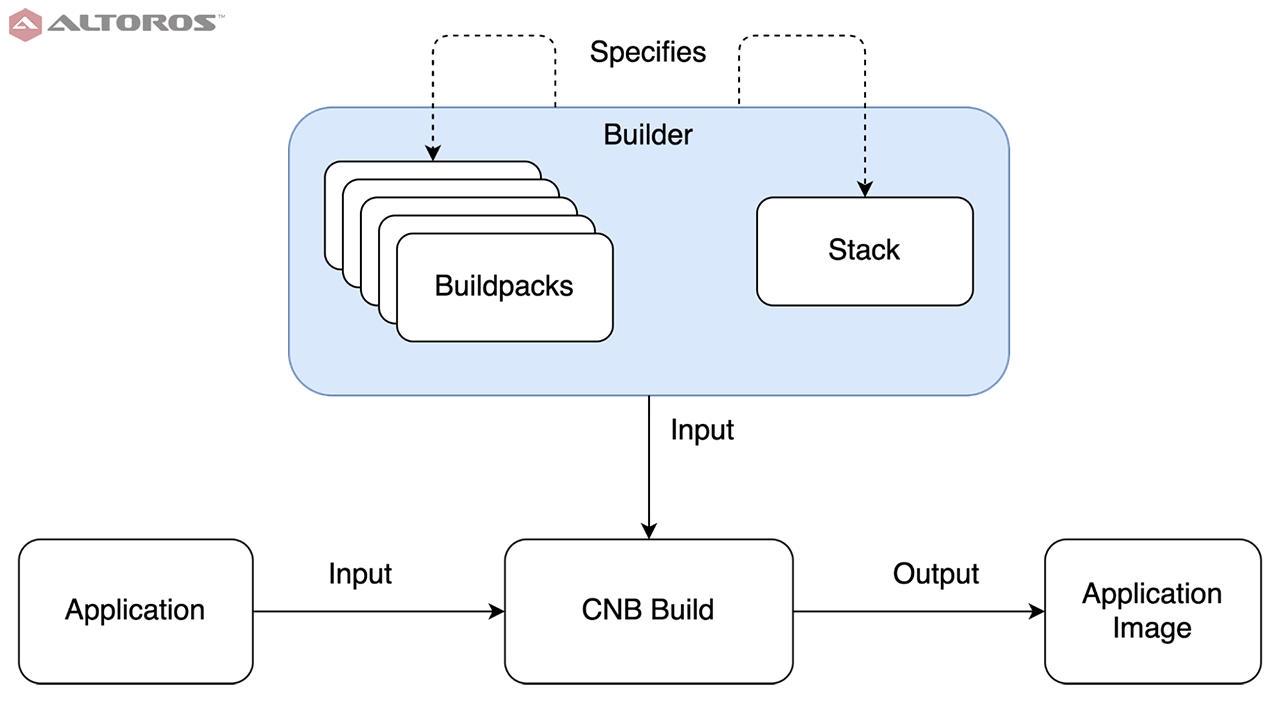
After creating a stack and a buildpack, we are ready to add the third and final Cloud Native Buildpacks component, the builder, to our example repository. The builder specifies which stack and buildpacks are available for use during the building of app images. This abstraction greatly simplifies the CNB build process.
 The builder’s place in the CNB process
The builder encapsulates multiple buildpacks, which means it can support different tech stacks. A single stack ensures consistency in the built app images. This means producing an app image only requires two inputs, an app and a builder.
 The structure and use of the CNB builder
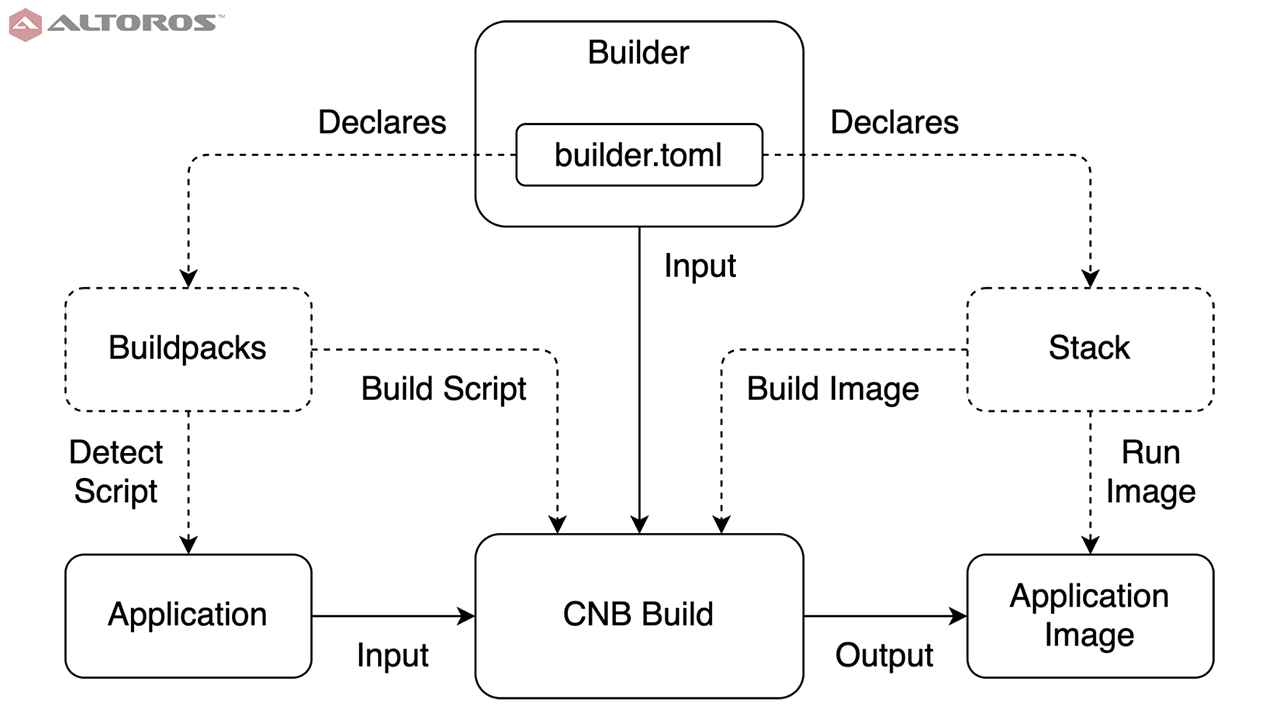
The builder itself is quite simple, only a single configuration file. Unlike the stack and buildpack, the builder’s work is organizational rather than functional, so there is not much code necessary. The important decisions here are which buildpacks and what stack will package applications.
This simplicity is reflected in the repository’s files. Only builder.toml, a TOML markup file, is needed.
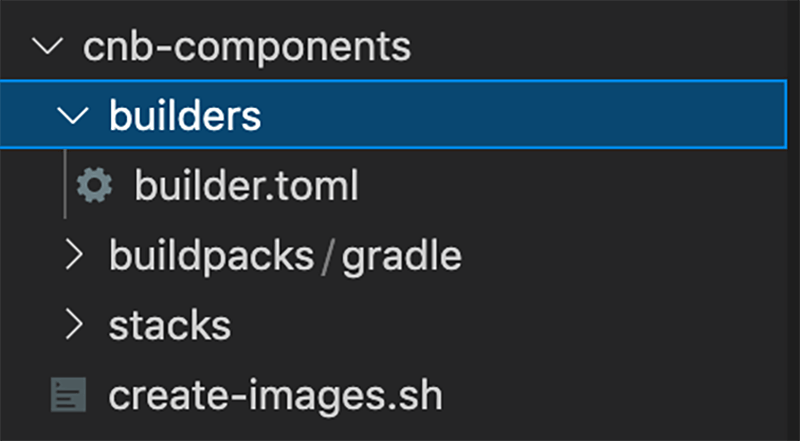 Builder-related files in the example repository
The builder.toml file
Just as with the buildpack, TOML files are used to declare the CNB framework configuration information. Unlike the buildpack configuration, the complete set of options for builder.toml is fairly small. For example, rather than arbitrary metadata, it only allows a single optional line:
description = "Altoros example CNB builder"
This is a brief description of the builder, and pack builder inspect <builder image> will show the text. The main job of the builder is managing available buildpacks. Availability is declared as shown below.
[[buildpacks]]
id = "altoros/gradle"
version = "0.0.1"
uri = "docker://altoros/buildpack:gradle"
The URI is the only required field and can point to a number of different file representations of a buildpack, including to the configuration source files. However, the best practice is to use a Docker image. Keeping every operations deliverable the same type means only a single process of storing and auditing, so things remain simple.
Multiple buildpacks can be specified with additional [[buildpacks]] blocks containing the same information. This list of buildpacks is not strictly required and does not need to be in any particular order. It is used, for example, to specify the URIs of different versions of the same buildpack. The order the buildpacks apply in is explicitly laid out in its own, required, section:
[[order]]
[[order.group]]
id = "altoros/gradle"
version = "0.0.1"
This TOML structure is equivalent to the JSON below.
{ "order": [
  { "order.group": [
    { "id": "altoros/gradle", "version": "0.0.1" }
  ] }
] }
Every buildpack in the builder has its own [[order.group]] block. A new [[order]] declaration indicates a new buildpack group. Groups are used to collect relevant or related buildpacks into a single working set. In the order written here, the framework runs the detect script for each buildpack in the group. The first group with all of its required buildpacks passing the detect phase is the group used to build the image. Buildpacks using different tech stacks (e.g., Java and Python) should be in separate groups, and, thus, separate [[order]] sections.
The other job of the builder is specifying a stack:
[stack]
id = "com.altoros.demo.cnb.stacks.ubuntu"
build-image = "altoros/build-image:ubuntu"
run-image = "altoros/run-image:ubuntu"
This required section specifies which stack is used, and what that stack’s build and run images are. With this, our builder is complete.
Building the image
Just as with the stack and buildpack, we’ll package the builder component into a Docker image. Similarly, the pack command is straightforward. From the cnb-components/builders directory in the example:
1 | pack builder create altoros/builder:ubuntu --config ./builder.toml |
This creates the Docker image altoros/builder:ubuntu as a CNB builder. This command can be found in the create-images.sh script. Once the image is created, we can view its information with pack builder inspect altoros/builder:ubuntu which will show the included buildpacks, their order and grouping, the chosen stack, and some framework metadata, including the description we wrote. Though the stack and buildpack images are necessary to create the builder, the packaged builder image has all of the data embedded in it, so producing an app image will only pull and use the builder image.
Putting it all together
With a completed builder, we can now use it to build an app image for the example Spring Boot API. From the root of the repository, run pack build altoros/cn-buildpacks-example --builder altoros/builder:ubuntu to produce the final app image. Start the image with docker run -d -p 8080:8080 altorosdev/cn-buildpacks-example, then GET http://localhost:8080/. You should receive Greetings from Spring Boot! as the response.
All of the CNB components can be published as Docker images to the CNB component registry to share with the community. Producing components as images makes them easy to consume, audit, manage, and maintain internally, as well.
Making your own Cloud Native Buildpacks framework components offers a great deal of flexibility and control over the Docker images used to deploy apps to production. The use of scaffolding to streamline the image building process can save organizations a great deal of time and complexity. Leveraging community-provided components means teams can try out the CNB process in an Agile manner, with minimal investment and risk. All in all, Cloud Native Buildpacks is an excellent addition to the software life cycle toolbox.
More in this series
- Cloud Native Buildpacks: How to Create a Custom Buildpack
- Cloud Native Buildpacks: Streamlining the Creation of Docker Images
- Cloud Native Buildpacks: Creating a Stack for Custom Components
edited by Carlo Gutierrez, Sophia Turol, and Alex Khizhniak.