A Multitude of Kubernetes Deployment Tools: Kubespray, kops, and kubeadm

Options at hand
When deploying a Kubernetes cluster to a production environment, managed installations allow for added flexibility and customization. To facilitate the process of deployment, one may enjoy a bunch of tools—e.g., kops, kubeadm, Kubespray, or Kubo.
These solutions are supported and maintained by the Kubernetes community, but what each of them can offer to a user and how are they different from each other? At a recent Kubernetes meetup in Sunnyvale, Sergey Matykevich of Altoros walked attendees through each tool.
Let’s start with kops, which enables users to create, update, or delete production-grade and highly available Kubernetes clusters from the command line interface. Being maintained by the core Kubernetes team, the biggest advantage of kops is that the chances are high for it to become a default method of installation in the future. Major features of the tool include:
![]()
- automated infrastructure creation and cluster deployment/provisioning
- support for native features of cloud providers
- support for updates and upgrades
With kops, one is also able to add a variety of custom Kubernetes add-ons. Apart from this, you may add containers as hooks and files to nodes via a cluster manifest. At the moment, kops is available for AWS, Google Compute Engine (beta), and VMware vSphere (alpha). You may check out this guide on how to install Kubernetes on AWS using kops.
Kubeadm
At large, kubeadm was designed to simplify Kubernetes bootstraping and installation of cluster add-ons. When announcing kubeadm in September 2016, the Kubernetes team stressed that the tool wouldn’t be engaged in provisioning of virtual machines—which is one of the three major stages in setting up a Kubernetes cluster. Regarding that the tool has no infrastructure dependencies, kubeadm seems to be a good choice for Kubernetes bare-metal installations or as a compliment to any other tooling a user may employ during a manual setup.
According to the official docs, kubeadm can be used in the following scenarios:
- to try out Kubernetes for the first time
- to deploy a cluster or test an app if already skilled in Kubernetes
- to be exploited as a building block in complex systems with some other installers
You will find some details on how the Kubernetes team sees the future of kubeadm in this blog post or you may check out the latest milestones in this GitHub repo.
There’s also Kubo—an installer originally developed by Pivotal and Google. Though supporting multiple cloud providers, Kubo uses BOSH to manage a Kubernetes environment, which calls for a specific developer expertise.
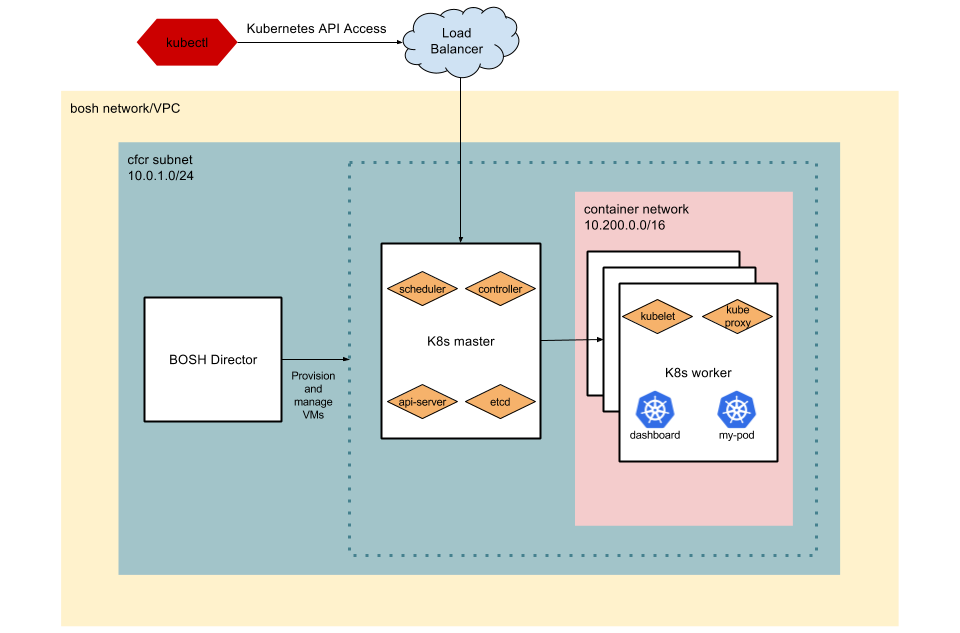 Kubo’s networking topology using IaaS load balancers (Image credit)
Kubespray
![]()
Incubated as a community project with 90+ contributors, Kubespray was designed to deploy Kubernetes clusters either in the cloud or on premises. Originally based on Ansible playbooks, the tool can boast of the following features:
- support for deployments on AWS, Google Compute Engine, Microsoft Azure, OpenStack, and bare metal
- deployment of Kubernetes highly available clusters
- a composable architecture with a choice from six network plugins
- support for a variety of Linux distributions
- support for continuous integration tests
- kubeadm under the hood
“Kubespray provides a good trade-off in the flexibility of a deployment. It allows you not only to easily deploy a cluster, but also to customize all aspects of the deployment.”
—Sergey Matykevich
The challenge with using Kubespray, as noted by Sergey, is that it does not automatically create virtual machines. However, this issue may be resolved by leveraging the supported infrastructure management tools, such as Terraform.
Using Kubespray
As from Sergey’s own experience, Kubespray strikes a balance between flexibility and ease of use. This was the reason to pay a bit more attention to the tool. So, he overviewed the steps needed to deploy a Kubernetes cluster with Kubespray and Terraform. The example uses Google Cloud Platform (GCP) as an underlying infrastructure, so anyone looking to follow the steps will need a GCP service account. Here are a couple of recommendations to start:
- Kubespray is under active development, so make sure to use a stable release version.
- When experimenting or deploying to different environments, use
--flush-cacheto minimize errors.
With Ansible being heavily reliant on SSH, the first step is to generate SSH keys. An SSH agent is also employed here to expose the SSH key, allowing the key to be used later.
1 2 3 4 5 6 7 8 9 | # Create new rsa keys if [ ! -f cust_id_rsa ] ; then ssh-keygen -t rsa -b 2048 -f cust_id_rsa -q -N "" fi # Load keys eval $(ssh-agent) ssh-add -D ssh-add cust_id_rsa |
As previously mentioned, Kubespray does not provision infrastructure, so an infrastructure tool like Terraform comes in handy. The following three commands will initialize and run Terraform.
1 2 3 | terraform init terraform plan -out cust.plan terraform apply cust.plan |
In this case, the infrastructure provisioned will depend on the variables included in the cust.plan file.
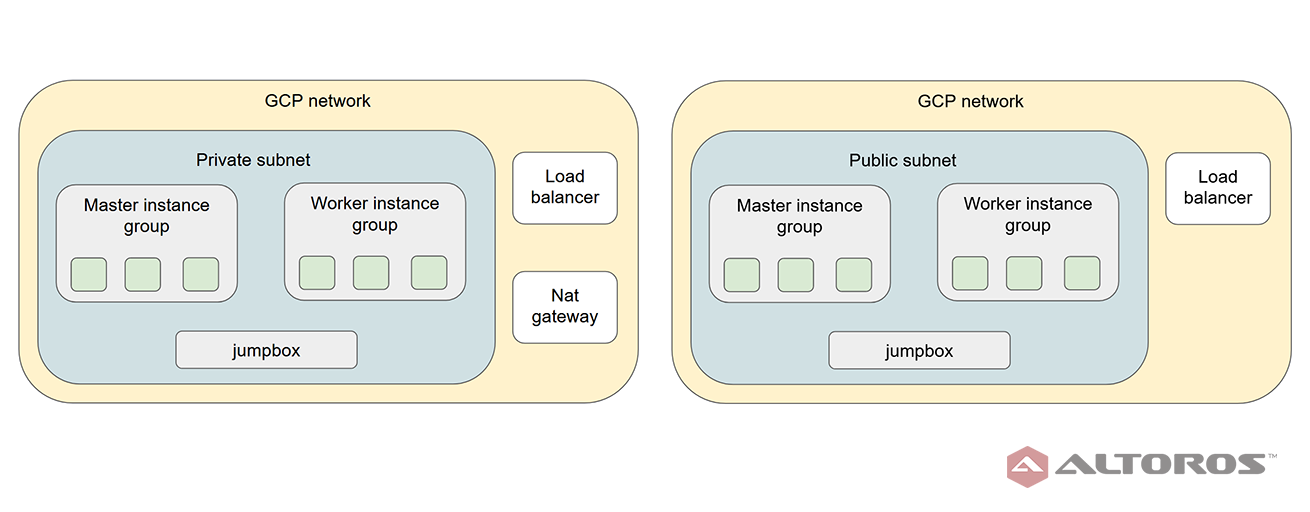 Private or public infrastructure can be created based on the Terraform variables used
With the infrastructure created, the following step identifies IP addresses for the jump box, load balancer, as well as master and worker nodes.
1 2 3 4 5 6 7 | bastion_ip=$(terraform output bastion_ip) lb_ip=$(terraform output lb_ip) master_ips=$(gcloud compute instances list --filter="${res_prefix}-masters" --format=json |jq -r '.[].networkInterfaces[].networkIP'|tr "\n" " "| sed -e "s/ \{1,\}$//") node_ips=$(gcloud compute instances list --filter="${res_prefix}-workers" --format=json |jq -r '.[].networkInterfaces[].networkIP'|tr "\n" " "| sed -e "s/ \{1,\}$//") |
To start the actual installation of Kubernetes, the Kubespray repo is cloned.
1 2 | git clone https://github.com/kubernetes-sigs/kubespray.git cd kubespray && git checkout ${kubespray_version} |
Customizations can then be applied. In this case, modifications to security roles were added.
1 2 | # bring in modifications, in particular security changes rsync -avz $git_root/mods/roles/* roles/ |
Next, the Kubespray inventory is generated. This enables Ansible to reach all the different hosts.
1 2 3 4 5 6 7 8 9 10 11 12 13 14 15 | [all] master1 ansible_ssh_host=10.0.0.8 ip=10.0.0.8 ... [kube-master] master1 master2 master3 [etcd] master1 master2 master3 ... |
To prepare the cluster, simply run the playbook. This takes about 15–20 minutes.
1 | ansible-playbook -vvv -i inventory/hosts.ini cluster.yml --flush-cache |
Finally, all that’s needed is to connect to the cluster.
1 2 3 4 5 6 | #change the admin.conf file to the current lb_ip sed -i -e "s/lb-apiserver.kubernetes.local/$lb_ip/g" inventory/artifacts/admin.conf ## echo out set KUBECONFIG echo "Set your KUBECONFIG" echo "export KUBECONFIG=$(pwd)/inventory/artifacts/admin.conf" |
There is also an official guide on installing Kubernetes on premises or in the cloud with Kubespray. For any info on the tool, you may check out Kubespray’s GitHub repo. The plans for the tool’s further development are available via its roadmap. For any community news around Kubespray, you may visit its channel on Slack.
Kubespray vs. kops vs. kubeadm
If comparing the three tools, Kubeadm provides support for most clouds and bare metal with Ansible employed to treat provisioning and orchestration matters. Unlike Kubespray, kops can handle provisioning and orchestration for itself, but this, in its turn, limits flexibility from the perspective of deployment platforms.
This way, Kubespray is a nice choice when you either are familiar with Ansible or seek a possibility to switch between multiple platforms. If your priority is tight integration with unique features offered by the supported clouds, and you plan to stick with your provider, kops may be a better option.
 Sergey Matykevich at the Kubernetes meetup held at Google
kubeadm covers the needs of a life-cycle management for Kubernetes clusters, including self-hosted layouts, dynamic discovery services, etc. Kubespray is more about generic configuration, initial clustering, and bootstrapping.
“Kubespray is a wrapper around kubeadm. It comes with a set of scripts and templates that we can use to spin up Kubernetes.” —Sergey Matykevich
However, Kubespray aims at adopting kubeadm to bridge the gap in the life-cycle management domain. Will it happen? We may see soon.
Want details? Watch the video!
In the video below, Christian Hercules of Altoros provides some extra demo on the topic covered by Sergey.
Related slides
Further reading
- Deploying Services to Cloud Foundry Using Kubernetes: Less BOSH, More Freedom
- Kubo Enables Kubernetes Environments Managed by Cloud Foundry’s BOSH
- Configuring UAA to Provide a Single Entry Point for Kubernetes and Cloud Foundry
About the expert