Deploying Services to Cloud Foundry Using Kubernetes: Less BOSH, More Freedom

A common way to deploy services on Cloud Foundry
In Cloud Foundry environments, services are commonly deployed as BOSH releases. Service brokers can then be implemented either on top of BOSH or on top of Cloud Foundry. While this is a common method for deploying services in Cloud Foundry, what happens when a BOSH release for a particular service isn’t available? In this case, a developer will have to create his or her own BOSH release.
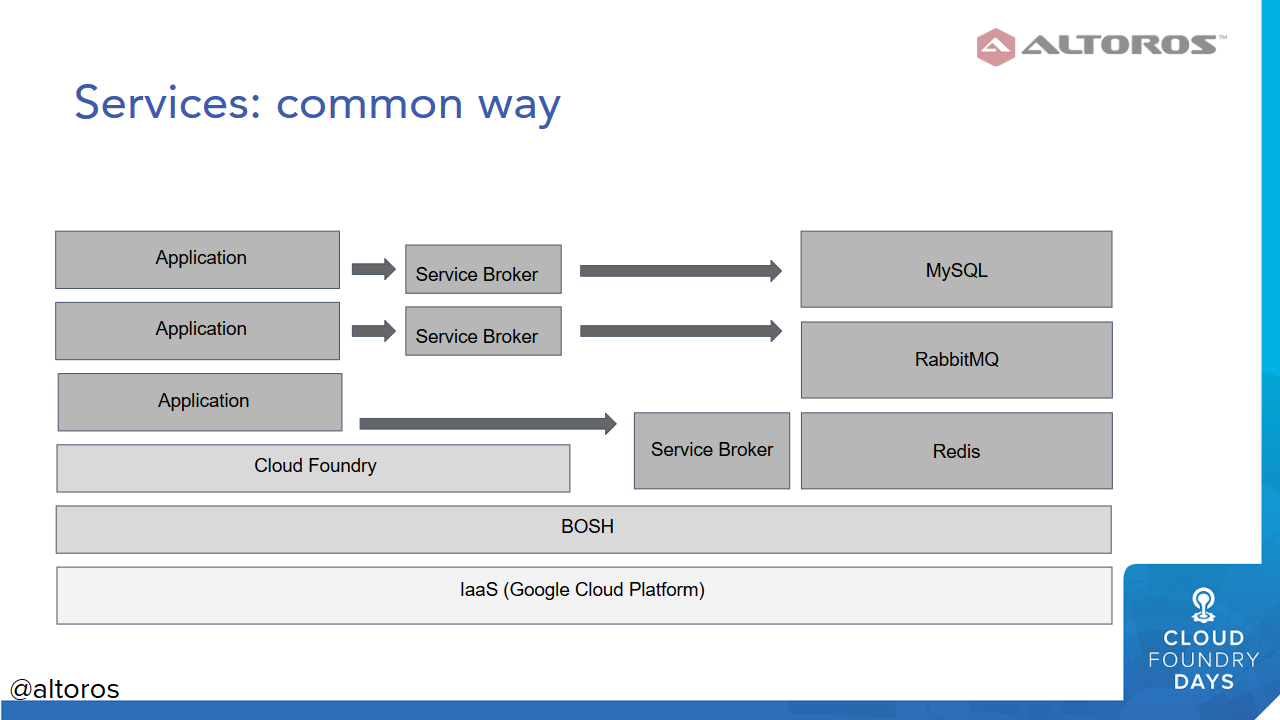 User applications are bound to services through service brokers (Image credit)
This is not necessarily a problem, and the process is well documented. However, it requires an understanding of BOSH fundamentals, such as what jobs and packages are, how Monit works, etc. Naturally, learning all of these takes time.
At KubeCon 2018, we introduced attendees with an alternative method of deploying services to Cloud Foundry using Kubernetes. The demonstrated approach aims at saving both time and effort as it doesn’t entail BOSH-specific expertise.
Using Kubernetes to host services
So, one may deploy services to Kubernetes as a ReplicaSet. Additionally, a service broker can also be developed and deployed. This enables developers to register the service broker to the Cloud Foundry marketplace, create a service instance, and then bind a user application to this service instance.
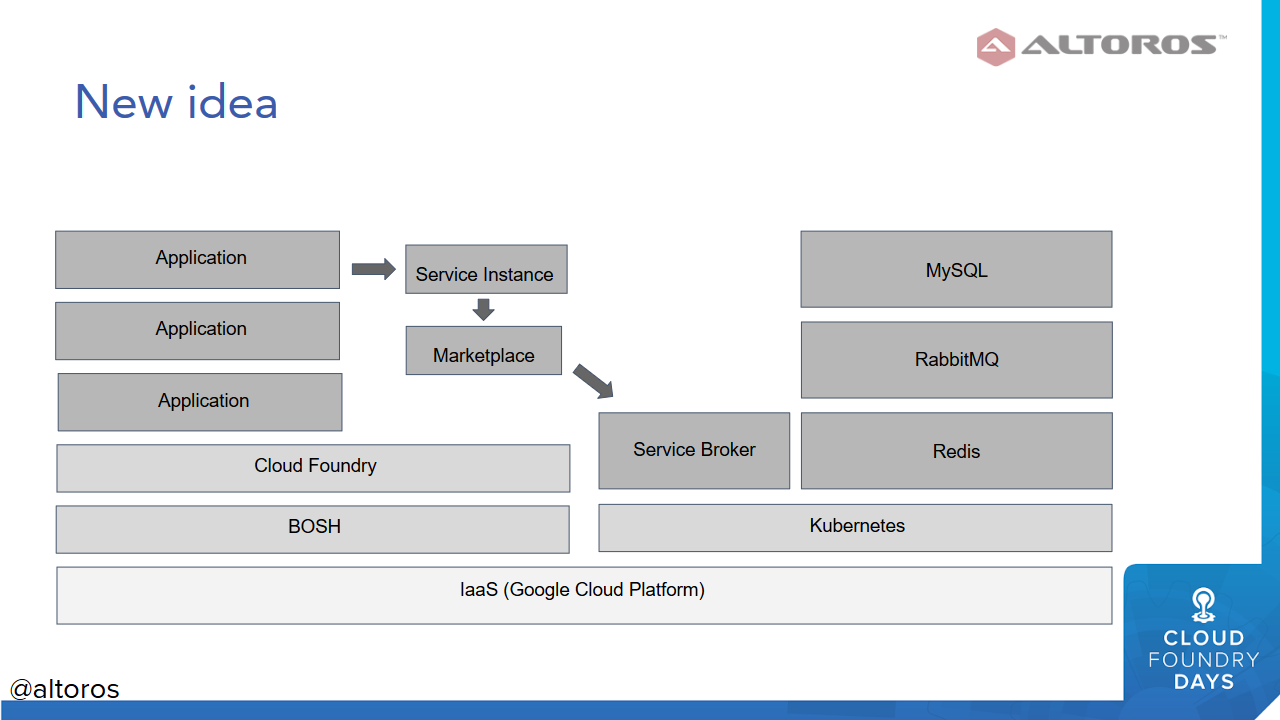 Using Kubernetes to deploy services to Cloud Foundry (Image credit)
Below, you will find the approach illustrated step by step.
Step 1.
First, one needs to clone a sample application.
1 2 3 | $ git clone https://github.com/cloudfoundry-samples/cf-sample-app-nodejs.git $ cd cf-sample-app-nodejs $ cf push |
Step 2.
To deploy a service to Kubernetes, one may use Helm. In this instance, MariaDB has been chosen, since it didn’t have a working BOSH release yet.
1 2 3 4 5 6 | $ helm search mariadb $ helm install \ --name mariadb \ --namespace mariadb \ --set service.type=LoadBalancer \ stable/mariadb |
Step 3.
After that, it’s time to clone the service broker. The service broker shown below was forked from the CF MySQL Broker. It now includes a Docker file.
1 2 | $ git clone https://github.com/axelaris/cf-mysql-broker.git $ cd cf-mysql-broker |
Step 4.
Next, a Docker image is created and run in a container locally. Then, the container is pushed into a repository.
1 2 3 4 5 6 | $ docker build . -t baber/cf-mysql-broker:latest $ docker run --rm -d -p 8080:8080 \ -e VAR_HOST=$MARIADB_IP \ -e VAR_PASS=$MARIADB_ROOT_PASSWORD \ baber/cf-mysql-broker:latest $ docker push baber/cf-mysql-broker:latest |
Step 5.
The repository is used to deploy the service broker on Kubernetes. Its IP address is also exposed to make it available externally.
1 2 3 4 | $ kubectl run broker --image=baber/cf-mysql-broker:latest --port=8080 \ --env="VAR_PASS=$MARIADB_ROOT_PASSWORD" \ --env="VAR_HOST=$MARIADB_IP" $ kubectl expose deployment broker --type="LoadBalancer" |
Step 6.
Finally, a service broker is created and is granted access in Cloud Foundry. Afterwards, a service instance is created and used to bind the sample application. On restaging, the application is bound to the service and deployed on Kubernetes.
1 2 3 4 5 | $ cf csb mariadb cc secret http://IP:8080 $ cf enable-service-access p-mysql-local $ cf create-service p-mysql-local 5mb my-maria $ cf bind-service cf-nodejs my-maria $ cf restage cf-nodejs |
Relying on this method, developers not familiar with BOSH can still deploy services to Cloud Foundry even if there is no available BOSH release.
Want details? Visit our upcoming training!
Related slides
Further reading
- Creating a Sample Service Broker for Cloud Foundry with Python’s Flask
- Using Logsearch for Hybrid Cloud Foundry and Kubernetes Deployments
- Configuring UAA to Provide a Single Entry Point for Kubernetes and Cloud Foundry