How to Install Jenkins CI on Cloud Foundry for Continuous Delivery

Continuous integration (CI) allows for pushing regular enhancements and bug fixes to your application in an easy, fast, and safe way. When using this practice, every time a developer commits a change, the software has to pass a number of tests. This guarantees that every new release is safe and bug-free. Ultimately, continuous integration can help to automate the entire software delivery process.
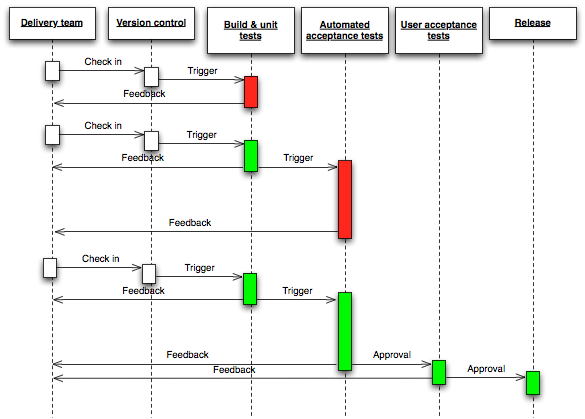 Software delivery process based on the continuous integration strategy (Image credit)
In this blog post, we will explain in detail how to set up continuous delivery for a Ruby on Rails (RoR) application running on the Cloud Foundry PaaS with Jenkins CI, a popular continuous integration tool.
Infrastructure and setup
For this tutorial, we used a simple RoR application with MySQL as a database. Then, we pushed the code to a public GitHub repository. The local workstation had the following specs: Ubuntu 13.10 x86_64 with MySQL Server 5.5.35. The remote virtual machine ran Ubuntu 10.04 x86_64 with Cloud Foundry v2 (5.4.5), Jenkins 1.550, and a MySQL client (5.1.73).
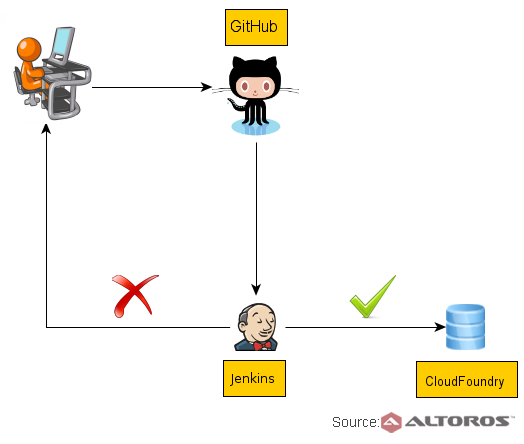 Pushing a Jenkins CI app to Cloud Foundry
So, let’s begin.
Setting up a remote system
Before you start, install Openssh-server (optional).
1 | sudo apt-get install openssh-server |
Then, install the latest stable Git from a PPA (Personal Package Archive), since the default Git version (1.7.0.4 for Ubuntu 10.04) is a bit of outdated.
1 2 3 4 | sudo apt-get install python-software-properties sudo add-apt-repository ppa:git-core/ppa sudo apt-get update sudo apt-get install git |
Configure Git.
1 2 | git config --global user.name “jenkins” git config --global user.email “jenkins@example.com" |
Configure iptables. Under this step, you also need to:
- enable an outbound connection on the remote machine to access the database on the workstation 1sudo iptables -A OUTPUT -p tcp -d database_host_ip --dport 3306 -j ACCEPT
- save the updated
iptablesrules to a file1iptables-save > /etc/iptables.rules - make sure the rules are restored at every boot 12345vim /etc/network/if-post-down.d/loadiptables#!/bin/bash/sbin/iptables-restore < /etc/iptables.rulesexit 0
Install RVM pre-requisites under Jenkins on the remote machine.
1 | sudo apt-get install curl libxslt1.1 libxslt-dev xvfb build-essential zlibc zlib1g zlib1g-dev bison openssl libreadline5 libreadline-dev libssl-dev libsqlite3-0 libsqlite3-dev sqlite3 libxml2-dev subversion autoconf libtool |
Install Cloud Foundry. Under this step, proceed with the following instructions:
- You can use the Cloud Foundry v2 Nise Installer. 1bash < <(curl -s -k -B https://raw.github.com/yudai/cf_nise_installer/${INSTALLER_BRANCH:-master}/local/bootstrap.sh)
- Then, restart your devbox.
- Launch Cloud Foundry. 12cd cf_nise_installer./local/start_processes.sh
- After this command, wait a couple of minutes to allow all the processes to start.
- Create an organization and space in Cloud Foundry, please follow the same order of commands. 12345cf api http://api.192.168.1.180.xip.io <span style="color: #0000ff;"># api..xip.io</span>cf login -u admin -p c1oudc0w <span style="color: #0000ff;">#credentials provided by cf installation tutorial, see references</span>cf create-org altoros <span style="color: #0000ff;">#enter your value</span>cf create-space -o altoros development <span style="color: #0000ff;">#enter your value</span>cf target -o altoros -s development
- Finally, add the
.manifest.ymlfile for the application to your RoR project directory (see the “Examples” section).
Now, it’s time to install Jenkins. For this purpose, follow the next steps:
- Install
openjdk-6-jreandopenjdk-6-jdk1sudo apt-get install openjdk-6-jdk openjdk-6-jre - Install the latest version of Jenkins 1234wget -q -O - http://pkg.jenkins-ci.org/debian/jenkins-ci.org.key | sudo apt-key add -sudo sh -c 'echo deb http://pkg.jenkins-ci.org/debian binary/ > /etc/apt/sources.list.d/jenkins.list'sudo apt-get updatesudo apt-get install jenkins
- Install a MySQL client 1sudo apt-get install mysql-client-core-5.1
Setting up an RVM
Switch to the jenkins account.
1 | sudo su Jenkins |
Install RVM for the jenkins user.
Important: DO NOT install RVM under the same account where you installed Cloud Foundry to avoid conflicting with RBenv.
1 2 | cd ~ \curl -sSL https://get.rvm.io | bash -s stable |
Install Ruby 1.9.3 or 2.x.0 according to your project settings.
1 2 3 | source ~/.bash_profile rvm autolibs disable rvm install 1.9.3 |
Create the cf2 gemset.
1 2 3 | rvm use 1.9.3 rvm gemset create cf2 rvm gemset use ruby-1.9.3-p484@cf2 |
Download and install the Cloud Foundry CLI from this GitHub repo.
1 2 | wget -O cf.deb https://s3.amazonaws.com/go-cli/releases/v6.1.2/cf-cli_amd64.deb sudo dpkg -i cf.deb |
Note: Currently, the latest version of Cloud Foundry CLI utility is v6.1.2. This may change in the future.
Generate a new SSH key and add it to GitHub.
1 2 3 4 | cd ~ mkdir .ssh cd .ssh ssh-keygen -t rsa -C "jenkins@example.com" |
Copy the public key to the appropriate settings tab of your GitHub account.
Finally, verify that everything worked out as expected.
1 | ssh -T git@github.com |
Configuring Jenkins CI
First, you need to add environment variables to Jenkins. To do this, go to: Manage Jenkins -> Configure System -> Global properties/Environment variables and fill out the following fields:
- login:
admin(provided in the Cloud Foundry installation tutorial, see the “References” section) - org:
altoros(created previously in the Install Cloud Foundry step) - password:
c1oudc0w(provided by in the Cloud Foundry installation tutorial, see the “References” section) - space:
development(created previously in the Install Cloud Foundry step) - target:
http://api.Address.xip.io(provided in the Cloud Foundry installation tutorial, see the “References” section)
Install the following Jenkins plugins: Git Client, GitHub, and Rake.
Configure Jenkins security by adding accounts with appropriate permissions.
Create a new Jenkins project. To do this, fill out the fields related to the GitHub project. Then, enter build steps into the Execute shell field (see the “Examples section”).
Add config files to the JENKINS_HOME/shared folder.
1 2 3 4 5 | cd JENKINS_HOME mkdir shared cd shared vim manifest.yml (see the “Examples” section) vim database.yml |
Since both Cloud Foundry and Jenkins were installed on the same machine in our setup, we had to assign free port 8081 to Jenkins to avoid conflict with Cloud Foundry. Edit the following line in /etc/default/jenkins.
1 2 | # port for HTTP connector (default 8080; disable with -1) HTTP_PORT=8081 |
MySQL configuration on a local machine
Enable an inbound connection on the workstation.
1 | sudo iptables -A INPUT -p tcp -s client_host_ip --dport 3306 -j ACCEPT |
Create a new account in the MySQL database and grant necessary permissions to a new user to access the project database remotely.
1 2 3 | GRANT ALL PRIVILEGES ON your_database.* TO 'user'@'remote_host' IDENTIFIED BY 'password'; |
Examples
Below, you will find a sample of manifest.yml.
1 2 3 4 5 6 7 8 9 10 11 | --- <em>applications:</em> <em>- name: bc</em> <font color="#0000ff"># you can use any name you like</font> <em>memory: 512M instances: 1 host: bc</em> <font color="#0000ff"> # use your own value here</font> domain: 192.168.1.180.xip.io <font color="#0000ff"># api.<ip Address>.xip.io accordingly to cf_nise_installer installation steps</ip></font> command: bundle exec rake db:drop db:create db:migrate && bundle exec rails s -p $PORT path: . env: DATABASE_URL: mysql2://user:password@host_name:port/db_name <font color="#0000ff"># replace with actual value</font> |
Important: It is necessary to provide the
DATABASE_URLvariable in the manifest file; otherwise, the deployment will fail. The full list of available environmental variables can be found in official docs.
Jenkins build steps from Execute shell are as shown below.
1 2 3 4 5 6 7 8 9 10 11 12 13 14 15 16 | #!/bin/bash -exl cd $WORKSPACE source ~/.bash_profile rvm gemset use ruby-1.9.3-p484@cf2 cp ~/shared/database.yml config/database.yml bundle install bundle exec rake db:drop RAILS_ENV=test bundle exec rake db:create RAILS_ENV=test bundle exec rake db:schema:load RAILS_ENV=test bundle exec rspec <strong>cf login -a ${target} -u ${login} -p ${password} -o ${org} -s ${space} cp ~/shared/manifest.yml . cf push cf logout</strong> |
We hope, this tutorial will help you to provide continuous integration on Cloud Foundry using Jenkins. If you have anything to add, just let us know in the comments.
Further reading
- Hidden Tricks of Jenkins to Bolster Continuous Integration on Pivotal Cloud Foundry
- 8 Pro Tips for Using Concourse CI with Cloud Foundry
- Addressing Complex Software Systems with Microservices and CI/CD
About the author
Aliaksei Marydashvili is a Cloud Foundry engineer at Altoros. Since 2005, he has acquired broad background in Java and Ruby on Rails. Currently, Aliaksei is improving experience with these technologies on Cloud Foundry, bringing his R&D expertise to integrate solutions around the PaaS and optimize software delivery processes.