Apatar Data Integration: A Quick-Start Guide

![]()
Apatar is an open-source cross-platform data integration tool. It can be installed and run on any machine that has some sort of user interface. The tool is designed to enable batch data integration and provide a simple user interface, so that anyone—not just technical experts—can set up data integrations.
In this blog post, we explore how to set up, configure, and operate Apatar. The tutorial also provides some tips on how to handle the most typical errors.
Installation
Note: If this is not the first time you install Apatar and you are installing Apatar to the same folder as previously, before you start the installation process, make sure you do not have any datamaps in the folder you are installing Apatar to, because the folder will be cleared when installation begins and you will lose your datamaps.
Windows
1. Run the .exe file you have downloaded.
2. At the first screen of the installer, select the components to be installed.

Installing Apatar
If you already have Java version 1.6x installed, uncheck ‘Java installer.’ If you do not want to see some connectors, data quality services, or operations displayed in the application, open the related list and uncheck the related components.
3. Once you have selected the components you want to have installed, click ‘Next.’
4. At the next screen, you get to select the folder that Apatar will be installed to and click ‘Next.’ By default, the application is installed to C:\Program Files\Apatar. You can have several instances of Apatar installed and running at the same time if you install them to different directories.
Note: If you have Vista or Windows 7, it is recommended that you install Apatar to a folder other than C:\Program Files\.
5. At the last screen, you get to select the name under which the application will appear on the list of programs in the ‘Start>Programs’ menu. Again, if you would like to have a number of Apatar instances installed (different versions, for example) make sure each instance is called differently.
6. Once the application is installed, you can launch it by clicking ‘Application’ or ‘Application no Apex’ in Start>Programs>Apatar or ‘Scheduling’ if you want to start Apatar’s scheduling application. Alternatively, you can double click application.bat, application_noApex.bat, or scheduling.bat in the folder that Apatar is installed to.
Linux
To install Apatar for Linux, do the following steps:
1. Unpack the apatar_<version_number>.tar.gz archive into any directory (e.g., <apatar_folder>).
2. Change system parameters for all files with the .sh extension in the <apatar_folder> directory.
Example:
Run this command from consol: #chmod 777 application.sh.
3. To start using Apatar, run any file that has the .sh extension. If you would like to run Apatar as a regular application (default), you need to launch the application.sh file. If you would like to run Apatar as a scheduling application (scheduling), you need to launch the scheduling.sh file (for example, #./application.sh).
Registration
When you start Apatar for the first time, the registration form opens up.
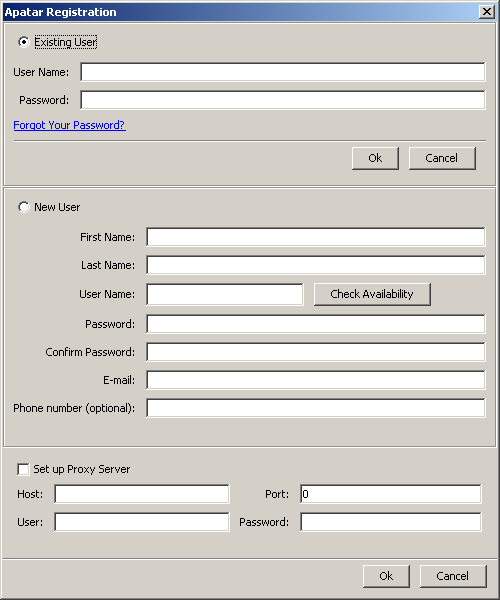
The Apatar registration form
If you have previously registered a user with Apatar (via Apatar application), keep the ‘Existing User’ selection and enter your username and password. If you do not yet have your username and password, select ‘New User’ and fill in the registration form. You can check whether the username you entered is taken or available before submitting the form by clicking ‘Check Availability’ next to the ‘User Name’ field. While creating your password, keep in mind that you can only use letters and digits.
If you are using a proxy server, tick the ‘Set up Proxy Server’ checkbox and enter your proxy details.
Note: You have to be connected to the Internet during the registration, as Apatar will need to send the data you entered to the server to verify your username and password or create a new user.
Application components
Application vs. Application no Apex
There are two applications available after installation: Application and Application no Apex. The only difference between them is that Application no Apex saves Salesforce.com access credentials. So if you are working with Salesforce CRM and especially if you are scheduling Salesforce CRM integrations, use Application no Apex.
Note: If you open a datamap by double clicking it, it appears in the Application.
If you opened your Salesforce CRM integration datamap in Application, exit Apatar without saving the datamap. This way, your Salesforce.com access credentials will not be lost.
Top menu
This is the list of the top menu items and the functions they perform.
1. FILE
- New creates a new datamap file.
- Open opens an existing datamap.
- Save saves the datamap.
- Save As saves the datamap under a different name/to a different location.
- Publish to Apatar posts your datamap to www.apatarforge.org if you would like to share it with other Apatar users.
- Scheduling opens Apatar’s scheduling application.
- Run starts the transformation.
- Options:
- Proxy enables you to enter/modify your proxy server settings. Details entered here will be applied throughout the Apatar application.
- Date and Time allows you to set the date and time format that is convenient for you. This allowed Apatar to simplify the process of filtering, validating, and processing data by date and/or time. You will not need to know the exact format of date/time, as it is stored in you database. Instead, if there is a need to validate data by date, you will enter the date in the format that is default for your instance of the application.
- Debug Options if checked, debug and error logs will be cleared each time you click ‘File>Run’ or ‘Run and Preview Results.’ This way, if an error occurs during the transformations, you can be sure that the logs contain all up-to-date information.
- Exit closes Apatar application
2. EDIT
Note: Not available in Apatar version 1.12.13 and older
- Cut
- Copy
- Paste
- Delete
These menu items let you copy/cut and paste or delete parts of your datamaps within the same datamap file or from one datamap file to another. You can copy the configured connectors and/or operations, field mappings, and functions
3. VIEW
Changes the application layout.
4. DEBUG
- Show Output (The ‘Debug Console’ window) shows information on successful and unsuccessful actions performed by the application.
- Show Error (The ‘Error Console’ window) shows information related to errors.
The same information is written to debug_output.txt and error_output.txt files respectively. (The files are located in the folder that you have Apatar installed to.)
If you click ‘Clear’ in the Debug Console, debug information will be deleted from this window and the debug_output.txt file. If you click ‘Clear’ in the Error Console, debug information will be deleted from this window and the error_output.txt file.
If you have ‘Clear debug and error outputs before each run’ checked in File>Options>Debug Options, information will be deleted from both consoles and output files each time you click ‘File>Run’ or ‘Run and Preview Results.’
5. COMMUNITY
- Catalog of Datamaps
- Demos
- Forums
- Wiki
6. HELP
- About contains product information
- Feature Request opens a feature request form
- Submit Bugs opens a bug submit form
- Tutorials opens the community documentation web page
Context menu
This is the list of the context menu items and the functions they perform.
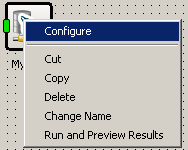
- Configure opens a connector, operation, or function for configuration.
- Cut, Copy, Paste, and Delete enable you to copy/cut and paste or delete parts of your datamaps within the same datamap file or from one datamap file to another. You can copy the configured connectors and/or operations, field mappings, and functions.
- Change Name renames a component.
- Run and Preview Results processes the selected node and previous nodes (connectors and operations). If clicked on a connector or there is a connector preceding the selected node, the data will be written to the connector(s), and the records resulting from this node processing will be displayed.
List of nodes
On the left, there is a tree with nodes grouped by type.
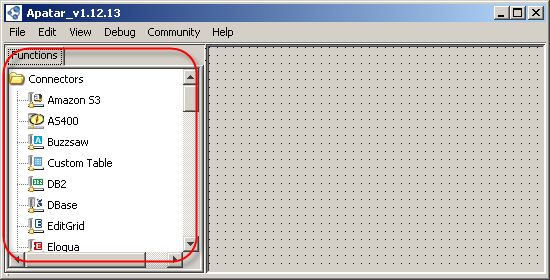
The list of nodes
- Connectors represent data sources that you can access.
- Data Quality Services are connectors to some CDYNE and StrikeIron’s Web services (you must have an account with the related Web service to use it).
- Operations are actions that you can perform with your data.
Work area
Most of the application window is taken up by the work area where you design your data integrations (datamaps).
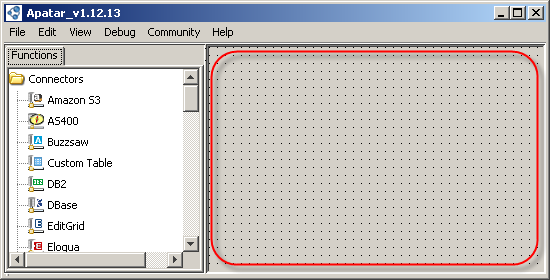
The work area
Supported data sources (connectors)
Having over 30 connectors, Apatar works with the data sources shown in the table.
| Centric CRM | DBase | .CSV | Amazon S3 | HTTP | Custom table |
| Compiere | IBM DB2 | .TXT | BuzzSaw | LDAP | |
| Eloqua | IBM AS/400 | EditGrid | File System | ODBC | |
| EnterpriseDB | MySQL | MS Excel | Flickr | RSS | |
| GoldMine | OpenEdge | XML | FTP | ||
| OpenBravo ERP | Oracle | WebDav | |||
| Salesforce CRM | PostgreSQL | ||||
| SugarCRM | SQL Server | ||||
| vTiger CRM | Sybase | ||||
| other systems | SyBASE | ||||
| Vertica | |||||
| Firebird |
Applications data can be accessed via a particular connector for that system, a relevant database connector, or the ODBC Generic connector if a system provides the ODBC driver.
Using Apatar’s connectors, you can insert or update (upsert) data (except for LDAP connector, which is read-only). Some connectors also support the delete mode, and the connector for Salesforce CRM can synchronize data.
Supported operations
With Apatar, you can do the following operations:
- transform data from one system to another preserving links between linked tables/objects
- aggregate data from multiple sources
- perform inner, left, or right join of data from different tables within one source or different data sources
- distinct data
- validate data using certain conditions and break it down into several streams based on the validation results
- filter data that cannot be filtered by a query at the connector level by a condition or a set of conditions
- perform bi-directional update of data between JDBC sources or a JDBC source and Salesforce
Each operation (except for Distinct) has at least one Inputs tab with the fields from your data source, the Functions tab, and the Edit Output button.
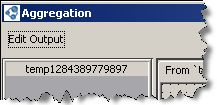
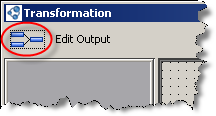
The Edit Output button
Use ‘Edit Output’ when you have one operation linked to another one to create output fields in that first operation.
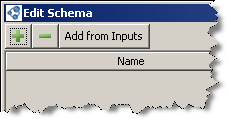
The Add from Inputs button
If you click ‘Add from Inputs,’ Apatar will copy output fields from input fields. If you have two inputs (in Join or Aggregate operation) and they have fields with the same names, Apatar will add the ‘_2’ suffix to the second field name. Alternatively, you can use the ‘+’ and ‘-’ buttons to create fields (set field name and select data types).
Note: ‘Edit Output’ only creates fields in Apatar’s temporary table. It cannot be used to create a new table in your data target.
Some operations also have the ‘Automap’ button.
The Automap button
It allows you to link input and output fields that are 100% identical (in terms of field properties, such as name, type, size, etc.) automatically.
Functions
All operations have the ‘Functions’ tab located either on the right (in Filter and Validate) or on the left of the screen along with input tab(s). It contains a set of functions that you can use to handle your data.
There are a number of data type conversion functions (which start with the ‘To’ prefix) that should be used between the fields that have different data types.
Example:
Use the To String function if you are writing from a Date, Boolean, LongText, etc., field to a Text field. Use To Date if you write from a text field to a Date field.
Constants (Text Constant, Boolean Constant, Current Date Constant, etc.) enable you to write the same value to a field for all records being processed. Functions, such as Greater Than, Contains, Is Empty, Match RegExp, etc., return Boolean true or false values and can be used to generate a Boolean based on the incoming records field values or to set up conditions in Filter, Validate, or Update operations.
Examples of other functions:
RegExpapplies a Regular Expression to input field values.Concatenatemerges two strings into a single one using this function.Replace With Functionreplaces multiple field values with new ones using this function.- The
AndandOrfunctions can be used to set up complex conditions.
Building a data integration job (datamap)
Here are some recommendations on how to create a data integration job.
Connectors configuration
Drag and drop connectors to the data sources you need to work with to the work area. To configure a connector, either double click it or right click it and select ‘Configure.’
Configuring a connector
At the first screen, enter your data source access details. Here, you can also select the connection to be used or create a new one.
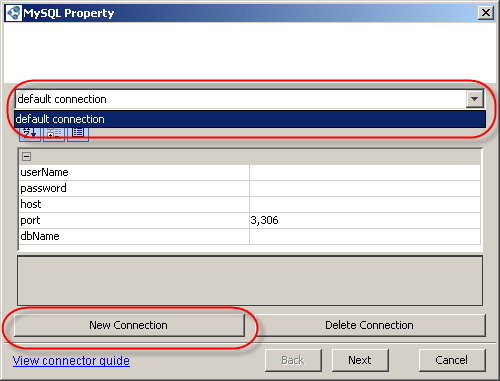
Creating a new connection
A connection includes data source access details, table selection, query (where supported), and mode. So, if you need to work with different tables within the same data source, it is not recommended to use the same connection as in the connector that is already working with that data source, because the changing connection settings within one connector (selecting a different table or changing a query, for example) will apply these changes to the rest of the connectors using the same connection.
For most connectors, the second screen normally contains the list of tables/data objects. The JDBC-based connectors and the connectors for Salesforce CRM also have a query box at this screen. This is where you can enter custom queries to filter records before they are retrieved to Apatar’s temporary table, limit the selection of columns, or read data from multiple tables if your data source supports the JOIN queries. Select the table you want to work with and click ‘Next.’
Note: One connector can only work with one table, unless you are reading from a data source that supports the JOIN queries. If you need to write to the related tables, use the Join operation.
 Customizing queries
The next screen shows the list of fields retrieved from the table selected. If you are writing data via a connector, at this screen you also select the mode in which the integration should run and if the table should be cleared if any data is written to it.
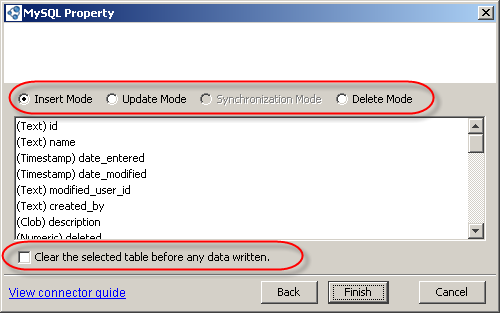
The list of fields
If you select the Update, Synchronization, or Delete mode, you have to select a field or set of fields that will be used as a primary key to match incoming and existing records.
Operations configuration
Once you are done with configuring connectors, drag and drop the operation(s) needed.
Note: If your source and target tables structures are 100% identical (in terms of field number and properties), you can link data sources directly.
To link connectors and operations, click on the output (red) point of your source connector, hold your mouse key, move the cursor to operation’s input (green) point, and release the key.
Just like with connectors, double-click or left-click an operation and select ‘Configure’ to start setting up actual fields mapping or validation/filtering condition. Drag and drop input and output fields and link them in the same way as you linked connectors and operations. Use functions where needed. You can use multiple functions between input and output fields.
If you selected the Update, Synchronization, or Delete mode, make sure you use the field(s) selected as the primary key in your fields mapping. Keep in mind that you can copy elements of your datamap.
Fields mapped can be copied and pasted between operations of the same type (from one ‘Transform’ to another, but not from ‘Transform’ to ‘Join,’ for example). Functions (RegExp, Replace With, etc.) can be copied from an operation of one type to an operation of another type (from ‘Filter’ to ‘Validate,’ for example). You can use the ‘Edit’ menu to copy elements of your datamap. Alternatively, once you select the elements to be copied, you can right-click them and select the right edit operation. Ctrl+C and Ctrl+V key combinations are also enabled.
Running a data integration job (datamap)
Here are some recommendations on how to run a data integration job.
Datamap testing
Once you have your datamap configured, you can start testing it.
To make sure that you see relevant error and debug logs, it is recommended that you either clear logs in Debug> Show Output and Debug Show error before every run/previewing result or tick ‘Clear debug and error logs before each run’ in the File>Options>Debug Options menu.
Start with previewing the results (Run and Preview Results on the context menu) on your source connector to make sure the right data will be retrieved. If everything is Ok, move to the next component. Previewing the results at each step (as opposed to running the entire datamap right away) will help you understand where the problem might be if an error occurs.
Example:
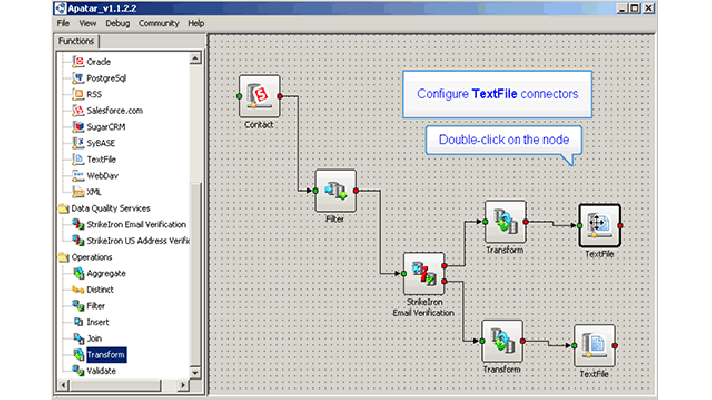
Let’s say you are retrieving records from SugarCRM, filtering and writing them to a MySQL database.
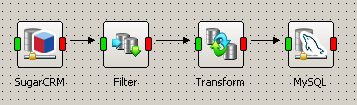
Filtering and writing records to MySQL
Preview on the connector for SugarCRM shows the right records, preview on Filter shows you only the records that should be passed further, but preview on Transform does not return anything. This means there is an issue with fields mapping and you could take a closer look at the Transform’s configuration.
Note: Keep in mind that ‘Run and Preview Results’ will write data to a connector.
Manual run
There are two ways to run a datamap:
- File>Run on the top application menu
- Run and Preview Results on the context menu
The difference between the two is that ‘File>Run’ will show the Progress window, which will then close once a datamap is processed. It is recommended for datamaps that have multiple targets or independent datamaps within one file.
Datamaps that are not linked to each other will be processed in the order in which they have been created.
In the screenshot below, Datamap 2 was created after Datamap 1, so even though it is located above Datamap 1, Datamap 2 will be processed only after Datamap 1 has been completed (regardless of whether the transformation has been successful or not).
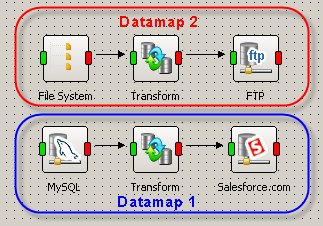
Processing Datamap 1 and Datamap 2
If you select to run your datamap using ‘Run and Preview Results,’ the data will be written to the target connector that you clicked on. Once writing is completed (regardless of the result), the data will be written from this connector.
Note: Apatar will retrieve all records from the selected table or matching the Select query entered in the connector, not just the records that have been inserted/updated.
If you have a datamap with multiple targets, you will have to click ‘Run and Preview Results’ at each target to get data written to all of them. Each time the datamap will be processed from the start. This approach is not recommended for datamaps that have auto-generated values (Generate UUID, CurrentTimeStamp, and some other functions) written to an intermediate connector.
Example:
Let’s say you are writing to a database that has a table storing company profiles (accounts), a table for contacts, a table where relationships between contacts and accounts, and a separate table with customer e-mail addresses that does have a field holding the related contact id.
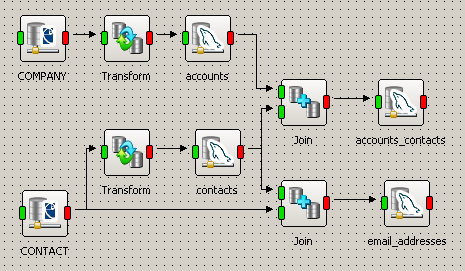
A database with multiple targets
As the database does not record ids automatically, the GenerateUUID function is used in both ‘Transform’ operations to generate ids. The accounts and contacts connectors are configured to run in the Update mode in case such account or contact already exists in the system.
You will first click ‘Run and Preview Results’ on accounts_contacts. This will create an account record in accounts, a contact record in contacts, and then a record in accounts_contacts that stores ids of prospects and ids of the related accounts.
Now when you click ‘Run and Preview Results’ on email_addresses without modifying your datamap, the processing will start from both target tables; both ‘Transforms’ will get processed again, new ids will be generated and written to the records that were created during the previous run. When e-mails get written to email_addresses, they will be related to the right contacts using new ids. However, the account and contact records updated with the new ids will no longer be related because the accounts_contacts table has not been updated and it still holds old ids—the ids that no longer exist in the system.
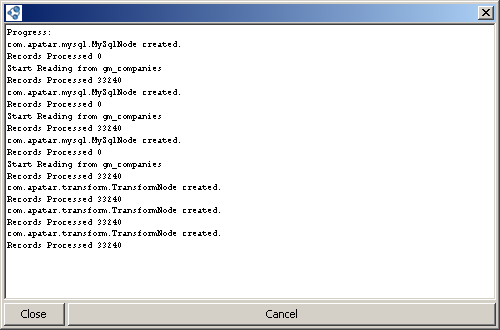
When your datamap is being processed, you can see the ‘Progress’ window.

The ‘Progress’ window
It shows the steps being completed and the number of records processed. Some types of errors are also shown here. If an error occurs and you would like to stop the transformation, click ‘Cancel.’ Make sure ‘Finish’ is shown at the end of the log in the progress window. This will mean that the transformation stopped.
Note: During processing, Apatar creates a temporary table where data is stored. So, you need to have enough free space on the disk where Apatar is installed—at least, the amount that equals the size of data you are working with.
Scheduled run
There are two ways to run Apatar datamaps based on a specific schedule:
- Apatar’s own scheduling application
- system’s scheduled tasks
The scheduling application has the functionality to set up data integrations to run daily or on certain days during a week/month/year, run once or several times during a day, run until it is deleted from the list of jobs or stopped or expire after a certain date or number of runs.
The specific feature of the Apatar’s Scheduling app is that it does not run as a service. If you log off, shut down, or re-boot the machine it is running at, it will get closed, too, and your scheduled integrations will not be launched. So, you will have to open it manually next time you log in.
If you use the Apatar’s Scheduling application, you can check logs in the error_output2.txt and debug_output2.txt files in the folder Apatar’s installed to. As an alternative to the Scheduling application, you can use the system’s own scheduled tasks using the command line parameters.
If you are using Windows Vista or Windows 7, you can enter command line parameters to the scheduled task itself. For Windows XP, you will need to create a .bat file (ordinary text file saved with the .bat extension) that would contain the correct command to be executed and schedule this .bat file.
When you set up scheduled tasks in the system, remember to enter the username and password of the user under which tasks should be run. If you schedule Apatar datamaps this way, logs will be written to the error_output.txt and debug_output.txt files in the folder Apatar’s installed to.
As Apatar does not have any native functionality to be triggered by certain events in other systems and applications, these command line parameters can also be used as a part of the script that will make Apatar to be involved in a more complex process and start a datamap processing upon a certain event.
Error handling
Here are some typical errors returned by Apatar. They appear either in the ‘Progress’ window, in ‘Debug>Show Error,’ or in both locations.
1. ‘ArrayIndexOutOfBoundsException: 0’, ‘StringIndexOutOfBoundsException: String index out of range: -1’
- Visual signs of the error: None.
- Problem: Clicks on components that are not clickable.
- Solution: None. These are errors related to UI and not influencing actual data transformations. Should be ignored.
2. ‘Table/View 'TEMP1285164176545' does not exist’
Visual signs of the error: An empty preview screen with no fields.
An empty preview screen with no fields
There are several reasons for this error.
- Problem 1: If you are reading from a database using a join query, you are probably selecting fields with the same name—RECID, for example. In this case, the error will be most likely accompanied by another error like: Column name ‘RECID’ appears more than once in the CREATE TABLE statement.
- Solution 1: If you need both of the fields, select one of them under a different name.
- Problem 2: While creating a temporary table, the Derby database malfunctioned and could not build a table.
- Solution 2: Go to Apatar’s folder, delete the ‘tempdb’ folder, and start Apatar again.
3. ‘Invalid character string format for type SMALLINT’ and similar errors
- Visual signs of the error: Window with no or only existing records shown on preview.
- Problem: Fields of incompatible types are linked directly.
- Solution: Insert proper data type conversion function (To String, To Int16, To Date, etc.) between the input and output fields of different types.
4. ‘A truncation error was encountered trying to shrink VARCHAR 'sometestvaluehere' to length 2.’
- Visual signs of the error: The preview window shows no records (if the error occurred on all records) or just records where this error did not occur.
- Problem: An input field contained more characters than a related output field allows.
- Solution: Either change output field size to allow the same number of characters as the input field, or, if this is not possible, utilize the Crop Right function. (If applied to fields other than text fields, To String should be used before it.)
A preview window with no records
5. ‘Column 'Company' specified twice’
- Visual signs of the error: The preview window shows no records.
- Problem: An output field is used twice in fields mapping within the same operation.
- Solution: Review your fields mapping and make sure each output field is only used once.
A preview window with no records
6. ‘Comparisons between 'VARCHAR (UCS_BASIC)' and 'LONG VARCHAR (UCS_BASIC)' are not supported.’
- Visual signs of the error: The preview window shows no records.
- Problem: The ‘Join’ operation uses fields of different types in the ‘Join on’ tab to match records from different tables.
- Solution: If you are working with a database as one of the sources, you can cast the field(s) used in ‘Join on’ to transform it to the same type as the related field of the second data source. Alternatively, use ‘Transform’ between a data source and ‘Join’. In ‘Transform’, use ‘Edit Output’>’Add from Inputs’ to create output fields, find the field you are going to join on, and change its data type to the data type of the other data source field you will be relating it to. In the work area, link all the fields you are going to be working with. In ‘Join,’ go to ‘Join on’ and re-select the field with changed data type so that it is updated in Apatar’s temporary database. If you also used this field in fields mapping in Join, make sure to replace it with the new field.
A preview window with no records
7. Each node processed several times
- Visual signs of the error: Progress log shows that each connector and operation is processed several times, though they are only linked to one other component from their output points.
- Problem: Apache Derby database malfunction.
- Solution: Close Apatar, delete the ‘temdb’ folder from the folder you have Apatar installed to, and launch Apatar again.
Progress log
Warnings and notifications
This is the list of the most common warning and notification messages.
1. ‘An error occurred while opening the Datamap: Uninitialized properties were found.’
- Problem: A datamap was created using an older version of Apatar. The newer version of the application that the datamap is opened with has some important modifications in one of the connectors or operations used. The modification might not influence the overall datamap performance though.
- Solution: Click through the connectors and operations to make sure they are configured properly.
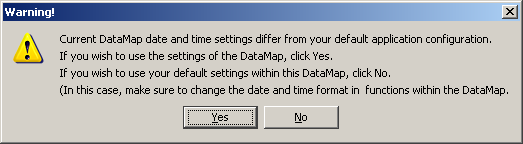
2. ‘Current DataMap’ date and time settings differ from your default applications configuration.’
- Problem: The instance of Apatar that the datamap was created in has date and time settings that differ from default date and time settings used in your Apatar application.
- Solution: Follow the steps mentioned in the warning. If you decided not to change your applications date and time settings, check operation(s) configuration. If there are date or time contacts or date and/or time are used in comparison functions, such as Greater Than, Equals, etc., their format should be the same as the default date and time format set in Apatar (in File>Options>Date and Time).
The error message