How to Set Up a GPU-Enabled TensorFlow Instance on AWS

Recently, Google announced the open-source release of its second-generation machine learning system, TensorFlow. Originally developed by the Google Brain Team, the library is used for numerical computations expressed as data flow graphs.
TensorFlow supports deployment to one or more CPUs or GPUs in a single machine. In this tutorial, we provide step-by-step instructions for installing the GPU version of TensorFlow on Amazon Elastic Compute Cloud.
Installation options
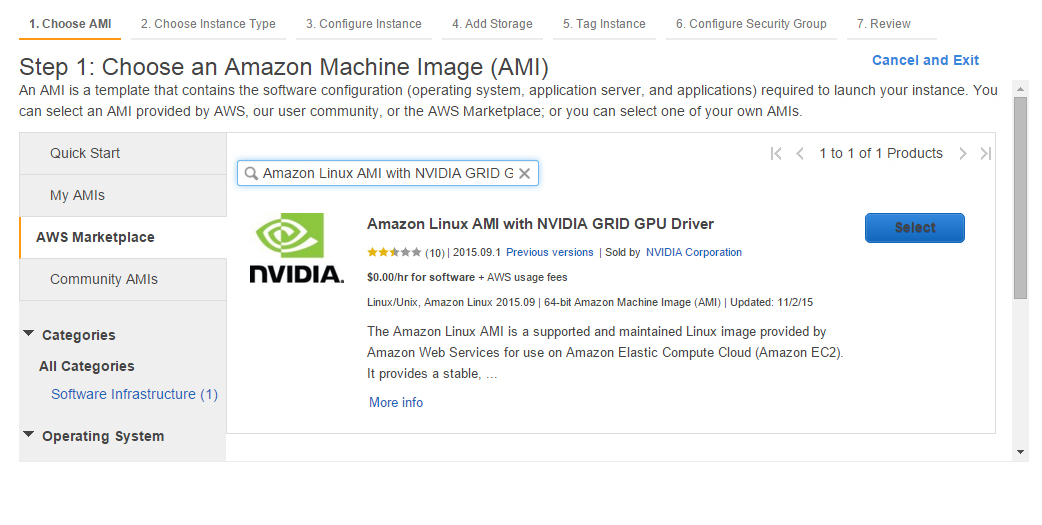
Until now, the primary option for configuring GPU-enabled TensorFlow on AWS was to use Amazon Linux AMI with NVIDIA GRID GPU Driver and follow the steps of this tutorial. However, it might take a day or two before you get access to all necessary NVIDIA libraries and set up the image.
To avoid the hassle, we have created an Amazon AMI that minimizes efforts needed to configure the environment and provides users with GPU-enabled TensorFlow on AWS right away.
Nevertheless, if manual configuration is a preferred method for you, follow the instructions below.
Creating an instance on AWS
- Select the Amazon Machine Image (AMI) named Amazon Linux AMI with NVIDIA GRID GPU Driver.
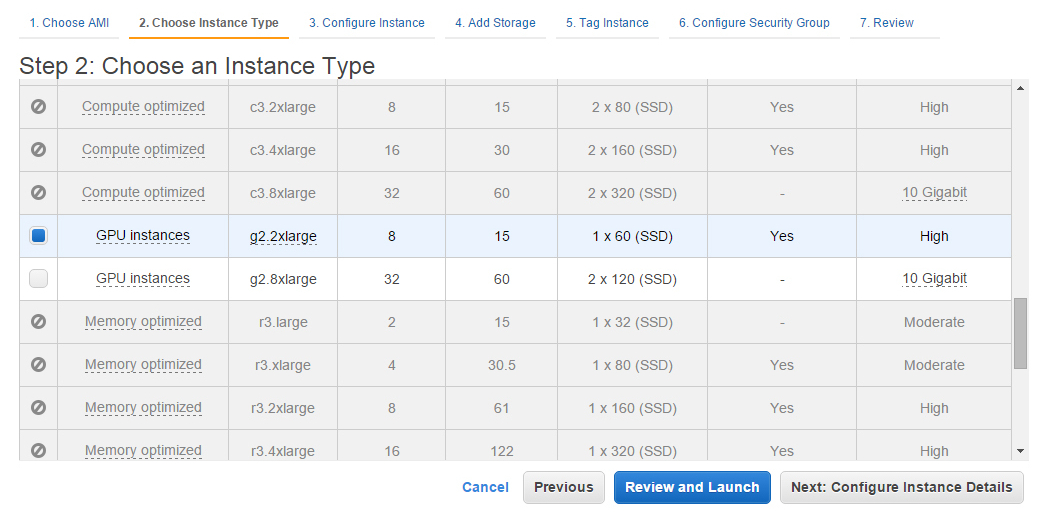
- Choose the instance type. We use
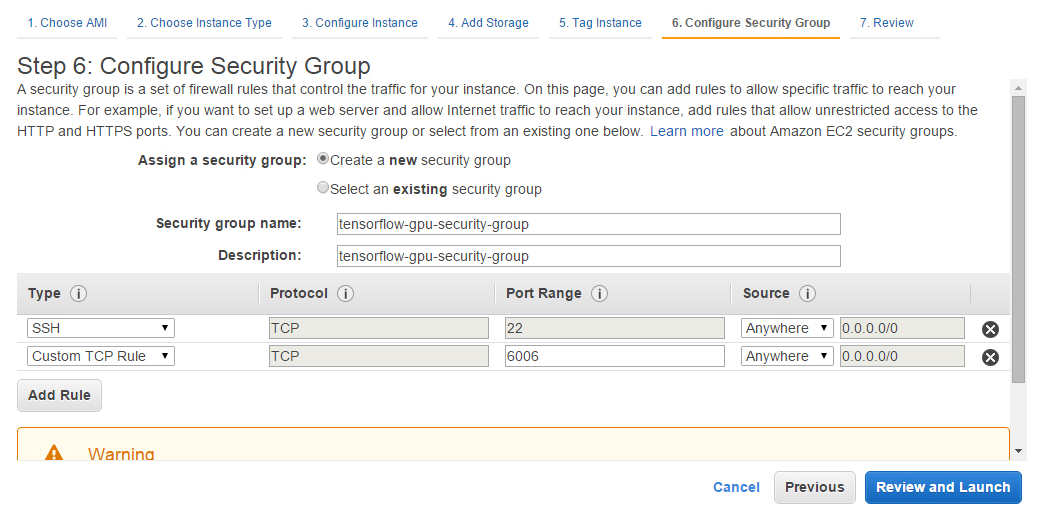
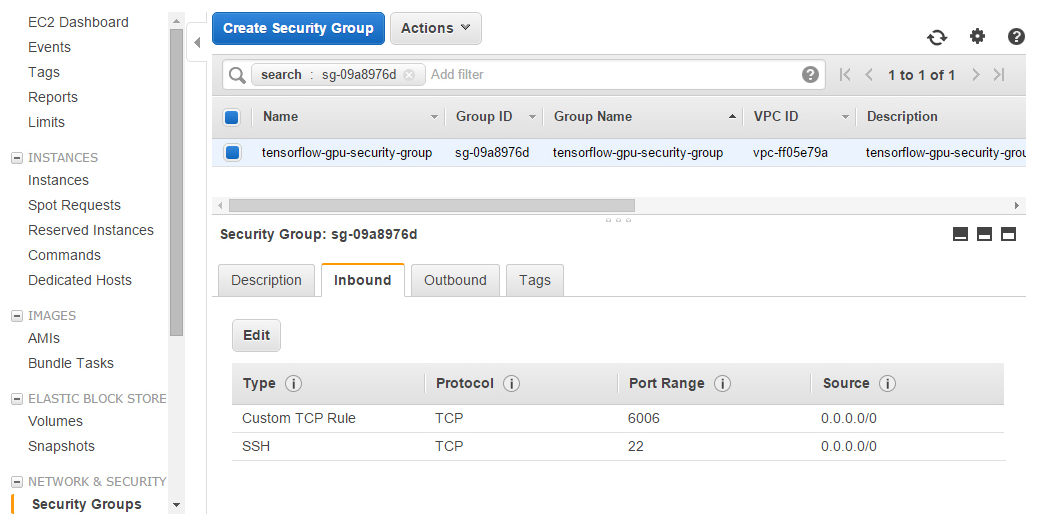
g2.2xlargewith 16 GB of SSD. - Configure a security group and add
port 6006to open inbound ports. - Configure other instance details and launch the instance.
- Generate (or reuse) authenticators to access the instance.
Configuring an environment
- Log in to the remote instance via SSH with the default username—
ec2-user. - Check the availability of Python 2.7, pip, and CUDA on the instance. Commands:
python –versionpip –versionnvcc –version
The chosen AMI contains:
- Python 2.7.10
- pip 6.1.1
- CUDA 6.5.12
- Install the CUDA Toolkit 7.0 (7.5 is not valid):
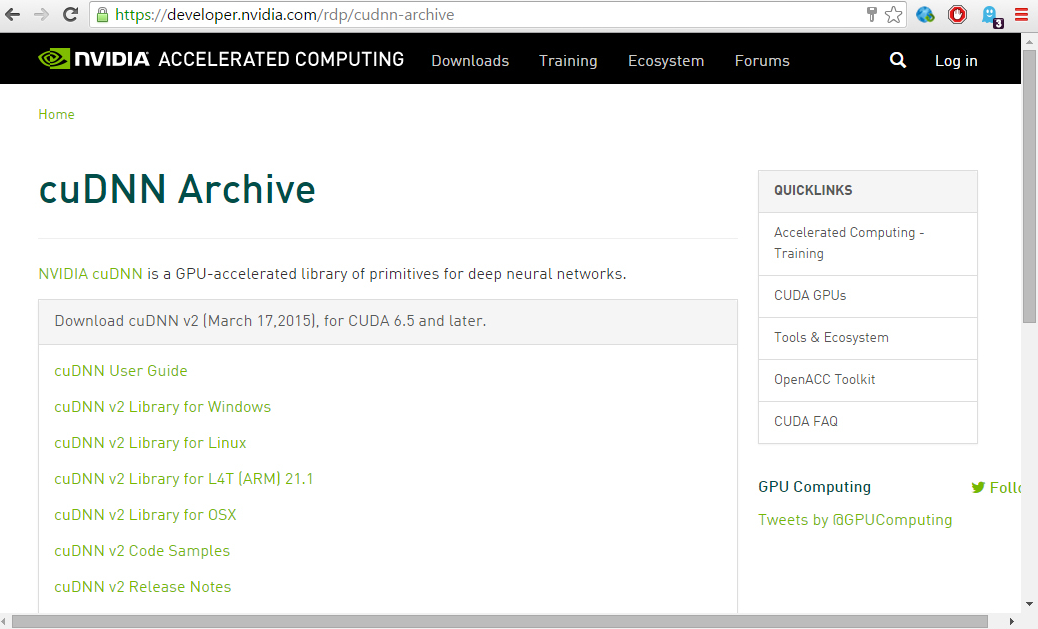
- Download cuDNN. Note: The cuDNN library from here is not valid for the current environment. You can download cuDNN from the archive. However, the mandatory registration might take 1–2 days.
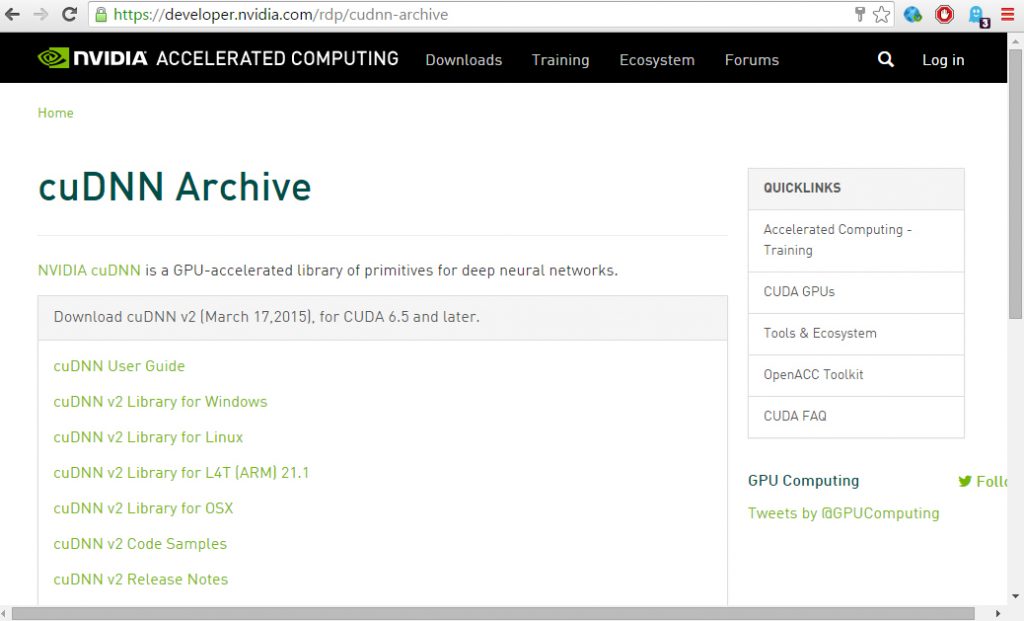
- Install cuDNN 6.5 v2 (this particular version is specified in the TensorFlow installation guidelines):
- Add the
LD_LIBRARY_PATHandCUDA_HOMEenvironment variables to~/.bashrc: - Install TensorFlow:
- Check whether the configured environment is correct using a Python terminal:
1 2 | wget http://developer.download.nvidia.com/compute/cuda/7_0/Prod/local_installers/cuda_7.0.28_linux.run sh cuda_7.0.28_linux.run |
Follow the instructions.
1 2 3 4 5 6 7 8 9 | Do you accept the previously read EULA? <strong>accept</strong> You are attempting to install on an unsupported configuration. Do you wish to continue? <strong>y</strong> Install NVIDIA Accelerated Graphics Driver for Linux-x86_64 346.46? <strong>n</strong> Do you want to install the OpenGL libraries? ((y)es/(n)o/(q)uit)<strong> n</strong> Install the CUDA 7.0 Toolkit? <strong>y</strong> Enter Toolkit Location [ default is /usr/local/cuda-7.0 ]: Do you wish to run the installation with 'sudo'? ((y)es/(n)o): <strong>y</strong> Do you want to install a symbolic link at /usr/local/cuda? <strong>y</strong> Install the CUDA 7.0 Samples? <strong>n</strong> |
1 2 3 4 5 | tar -zxf cudnn-6.5-linux-x64-v2.tgz cd cudnn-6.5-linux-x64-v2 sudo cp -R lib* /usr/local/cuda/lib64/ sudo cp cudnn.h /usr/local/cuda/include/ cd |
1 2 | export LD_LIBRARY_PATH="$LD_LIBRARY_PATH:/usr/local/cuda/lib64" export CUDA_HOME=/usr/local/cuda |
1 | sudo pip install https://storage.googleapis.com/tensorflow/linux/gpu/tensorflow-0.6.0-cp27-none-linux_x86_64.whl |
Response:
1 2 3 4 5 6 7 | Expected result Installing collected packages: six, numpy, tensorflow Found existing installation: six 1.8.0 Uninstalling six-1.8.0: Successfully uninstalled six-1.8.0 Running setup.py install for numpy Successfully installed numpy-1.10.1 six-1.10.0 tensorflow-0.5.0 |
1 2 3 4 5 6 7 8 9 10 | $ python >>> import tensorflow as tf >>> hello = tf.constant('Hello, TensorFlow!') >>> sess = tf.Session() >>> print sess.run(hello) Hello, TensorFlow! >>> a = tf.constant(10) >>> b = tf.constant(32) >>> print sess.run(a+b) 42 |
Running a sample
- Install Git:
- Clone the project:
- Run the TensorFlow neural net model:
1 | sudo yum install git -y |
1 | git clone --recurse-submodules https://github.com/tensorflow/tensorflow |
1 | python tensorflow/tensorflow/models/image/mnist/convolutional.py |
Response:
1 2 3 4 5 6 7 8 9 10 11 12 13 14 15 16 17 | Initialized! Epoch 0.00 Minibatch loss: 12.054, learning rate: 0.010000 Minibatch error: 90.6% Validation error: 84.6% Epoch 0.12 Minibatch loss: 3.285, learning rate: 0.010000 Minibatch error: 6.2% Validation error: 7.0% Epoch 0.23 Minibatch loss: 3.473, learning rate: 0.010000 Minibatch error: 10.9% Validation error: 3.7% Epoch 0.35 Minibatch loss: 3.221, learning rate: 0.010000 Minibatch error: 4.7% Validation error: 3.2% |
Using TensorBoard
To enable TensorBoard, proceed with the following steps.
- Add
/usr/local/bintoPATHvia.bashrcand then log in to the OS again: - Copy the
TAGfile: - Copy the
favicon.icofile into the TensorBoard folder: - Check the AWS security group. The inbound TCP
port 6006must be openned. - Run TensorBoard on the server:
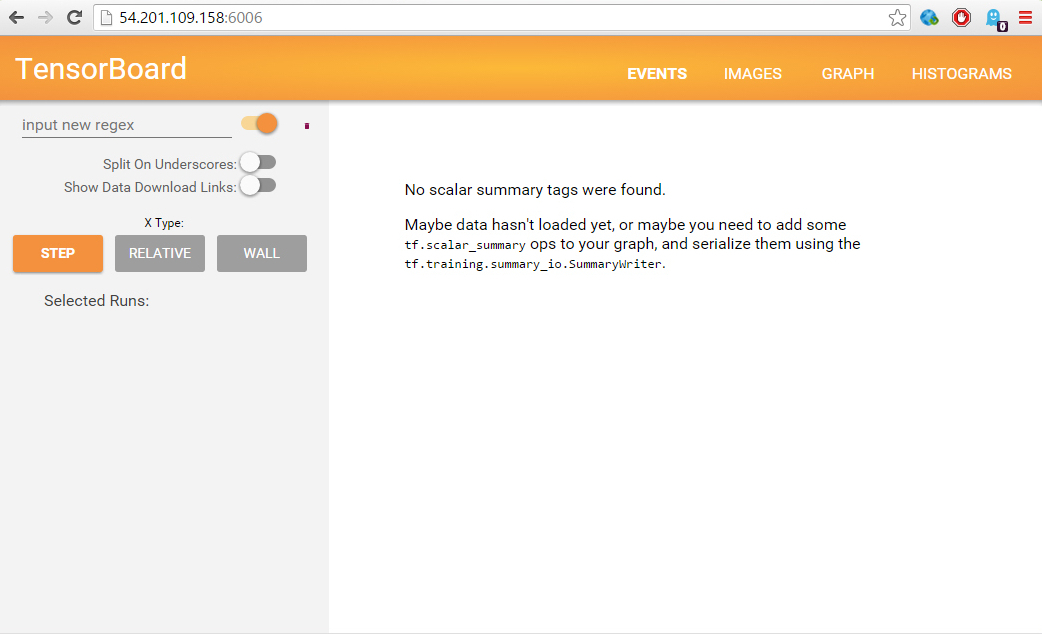
- Open TensorBoard in a browser.
1 | PATH=$PATH:$HOME/bin:/usr/local/bin |
1 | sudo cp -R /home/ec2-user/tensorflow/tensorflow/tensorboard/TAG /usr/local/lib/python2.7/site-packages/tensorflow/tensorboard/TAG |
1 | sudo cp favicon.ico /usr/local/lib/python2.7/site-packages/tensorflow/tensorboard/ |
1 | tensorboard --logdir /var/log |
Following the provided instructions, we were able to launch a TensorFlow instance from Amazon Linux AMI with NVIDIA GRID GPU Driver and keep it running. The task, nevertheless, required going beyond the default AMI configuration.
So, if you do not need manual configuration, you can use our one-click AMI.
Further reading
- TensorFlow in the Cloud: Accelerating Resources with Elastic GPUs
- Performance of Distributed TensorFlow: A Multi-Node and Multi-GPU Configuration
- Getting Started with a CPU-Enabled TensorFlow Instance on AWS
- Announcing GPU-Enabled TensorFlow Instances on AWS
About the author
Evheny Shaliov is a software developer at Altoros with 5+ years of experience in architecture design and database development. He has strong skills in building microservices-based architectures that use NoSQL data stores. Evheny is a teaching assistant in Belarusian State University of Informatics and Radioelectronics; he’s also studying for a PhD in information security.