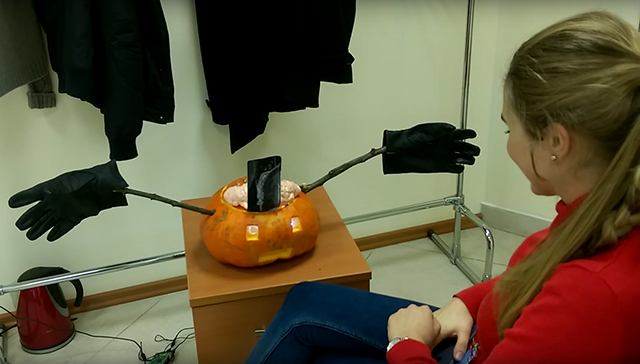
Smart Halloween: A Talking Pumpkin Created with IBM Watson and Raspberry PI

In this article, we describe how to assemble such a smart pumpkin and what issues you may face while having fun with a similar IoT project.
What’s in the pumpkin brain?
To make the pumpkin smarter, we used a Raspberry PI device (as a host) and a Logitech C270 webcam (as a microphone), as well as Node.js and text/speech recognition services from IBM and Google.
Speech to Text (STT). For recognizing the English language, we tested IBM Watson’s Speech to Text. Even though the service failed to identify “Hello,” it was pretty good at converting other words.
While Speech to Text supports only eight languages, wit.ai works with 50 languages. (We used Wit.ai for the Russian language.)
Chatbot. For generating answers, we chose the cleverbot.com service that understands 39 languages. (Do not confuse it with cleverbot.io.) You can play with the service in the browser and use voice, but its API supports only text messages. It looks like the service had been trained on teenager chats, so we sometimes got funny answers when we included slang in communication.
If your goal is not just fun, you should consider creating your own chatbot and training it. The services like cleverscript.com, Wit.ai, and IBM Watson’s Conversation enable you to do that. Read our article about developing a five-minute “Hello, World” chatbot with IBM Watson and Bluemix.
Text to Speech (TTS). IBM Watson’s Text to Speech supports nine languages, and detects the language automatically. In addition, you can control voice expressiveness and customize the English voice using seven types of transformations. However, these features are not available for other languages. The service returns files in .ogg, .flac, .wav, and several other formats.
Google’s Text-to-Speech supports 30 languages, but it sounds more robotic. You specify the language; it is possible to adjust the speed of speech. The service output is in the .mp3 format.
Data workflow
This project flow is completely asynchronous.
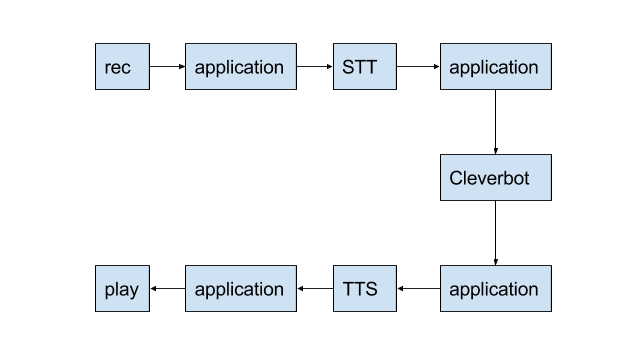
Depending on the API, you could get more than one response from STT, and SoX will try to play them simultaneously. It allows the chatbot to start talking with itself. Although it might sound funny, we wanted to prevent this and just skipped the responses that came while we were playing the first response. Creating a queue of responses is also an option.
If you use Wi-Fi, you may experience some lags when working with audio formats that are not compressed. We selected the .flac output in IBM Watson, and Google uses .mp3 by default.
To save traffic and money, it also makes sense to either implement offline recognition for the wake-up word via PocketSphinx and then apply the online services of your choice to convert the rest of the speech or add a push-to-talk button.
Assembling the hardware
We summarized the steps you need to follow when making your own smart pumpkin. Before you start, ensure that you have these supplies:
- a Raspberry PI device
- an SD card
- a USB microphone
- an external speaker
- Ethernet and power supply cables
To prepare the hardware:
- Flash the SD card using Raspbian and Etcher.
- Insert the SD card into your Raspberry PI.
- Connect the following components:
- The USB microphone to the first USB port of the Raspberry PI device.
- The external speaker to the AUX port.
- The Ethernet cable to the Ethernet port. Your network must have a DHCP server.
- The power supply cable to the micro-USB port.
Configuring Raspberry PI
After you connect the hardware, configure the Raspberry PI device:
Find the device with the
raspberrypihostname in your network:1arp -a | grep raspberrypiSSH to the Raspberry PI using the default password—
raspberry:1ssh pi@<em>ip_from_previous_step</em>(Optional) Enable VNC and change the password:
1sudo raspi-configTo have VNC started on boot, add the
nano ~/.config/autostart/tightvnc.desktopfile with the following content:12345[Desktop Entry]Type=ApplicationName=TightVNCExec=vncserver :1StartupNotify=false(Optional) To get rid of the Ethernet cable, connect to your Wi-Fi.
By default, channels 12 and 13 are not enabled, and PEAP-MS-CHAP v2 authentication is not supported. You might also want to use a power bank instead of the power supply cable.
To set the USB microphone as the default input device, create the
nano ~/.asoundrcfile with the following content:1234567891011pcm.!default {type asymplayback.pcm {type plugslave.pcm "hw:0,0"}capture.pcm {type plugslave.pcm "hw:1,0"}}Here,
1is the number of the Raspberry PI USB port.
Installation instructions
Dependencies
To install the dependencies—Node.js, SoX, and Forever—run the following commands:
1 2 3 4 5 6 | curl -sL https://deb.nodesource.com/setup_6.x -o nodesource_setup.sh sudo bash nodesource_setup.sh sudo apt-get update sudo apt-get upgrade sudo apt-get install sox libsox-fmt-all nodejs build-essential sudo npm install forever -g |
Running the application
We created an application that uses the mentioned web services to recognize voice, generate textual answers, and convert them to speech. Here are the instructions for running the app:
Clone the repository and change your current directory:
12git clone https://github.com/melnikaite/pumpkin.gitcd pumpkinCreate a Wit.ai application or IBM Watson services and export them using the corresponding command below:
1export STT=WIT STT_TOKEN=XXX STT_DELAY=3000 TTS=GOOGLE TTS_LANG=ruor
1export STT=WATSON STT_USERNAME=XXX STT_PASSWORD=XXX TTS=WATSON TTS_USERNAME=XXX TTS_PASSWORD=XXXStart your application:
1forever start index.js
To stop the application, run this command:
1 | forever stop index.js |
At this point, you can back up the SD card. First, shut down your Raspberry PI via sudo shutdown or VNC. Then, insert the SD card into your card reader and follow these instructions.
Conclusions
Initially, we tried to use Jasper, an open-source project that allows you to create your own Siri offline or using service providers of your choice. It is possible to work with existing modules, which perform actions depending on your request, or make your own.
We spent one day compiling dependencies, but the platform failed to recognize even a wake-up word. Most of the libraries are obsolete, and it is hard to use them for languages other than English. So, we decided to proceed with external services.
However, in my opinion, using AI for a chatbot today can be beneficial only if it is trained for a specific case. Otherwise, it is just fun.
IBM Watson’s Text to Speech service is good enough to be used, but you still may notice that the voice is synthetic. The Speech to Text service did not perform very well, especially offline, and made a lot of mistakes. It is also quite expensive for full-time usage. If you need only English support, check out this comparison of voice recognition tools.

Some services provide support for a huge number of languages, but quantity does not equal to quality. For pet projects, consider free Wit.ai as a means of converting speech to text and Google Text-to-Speech as a tool for the opposite task. For business cases, IBM Watson seems to be a more reasonable choice.