Consensus in Hyperledger Fabric: Migrating from Kafka to Raft

A new ordering service available
Kafka-based consensus (ordering service) poses a viable fault-tolerant solution for Hyperlуdger Fabric to be used in a production-grade network. Since version 1.4.1, the Fabric introduced the Raft ordering service. With this option, you get a distributed fault-tolerant service, which is easier to set up and maintain. It can extend a network with new organizations, as we don’t need to rely on a third-party Kafka cluster.
In the previous versions of the platform, it was impossible to change a consensus type of a blockchain network without full redeployment. However, Hyperledger Fabric v1.4.2 introduced a mechanism that makes it possible to migrate a network from a Kafka consensus to a Raft-based one.
The official documentation for this version describes the migration process from a high-level perspective, assuming that a user has sufficient expertise around channel configuration update transactions. So, we decided to provide a more detailed, step-by-step tutorial—exemplified on the “Building Your First Network” (BYFN) scenario. We also deliver recommendations on configuring the Raft ordering service and testing chaincode invocation.
To follow the instructions below, you need to be familiar with the basics of Hyperledger Fabric architecture, as well as Docker Compose. Before proceeding with our tutorial, please check out the official prerequisites.
Launch a network with a Kafka orderer
With the following commands, we will clone a repository with the BYFN example and download Docker’s Hyperledger Fabric images and binary files to create our blockchain network.
1 2 3 4 5 6 7 8 9 10 11 | git clone https://github.com/hyperledger/fabric-samples.git cd fabric-samples git checkout v1.4.2 curl -sS https://raw.githubusercontent.com/hyperledger/fabric/master/scripts/bootstrap.sh -o ./scripts/bootstrap.sh # Change file mode to executable chmod +x ./scripts/bootstrap.sh # Download binaries and docker images ./scripts/bootstrap.sh 1.4.2 |
We recommend to mount workdirectory of the CLI container to your host machine. It will help us to edit configuration files with some nice GUI text editors or easily copy configs from a remote to a local machine.
So, open first-network/docker-compose-cli.yml. It should look like in the screenshot below.
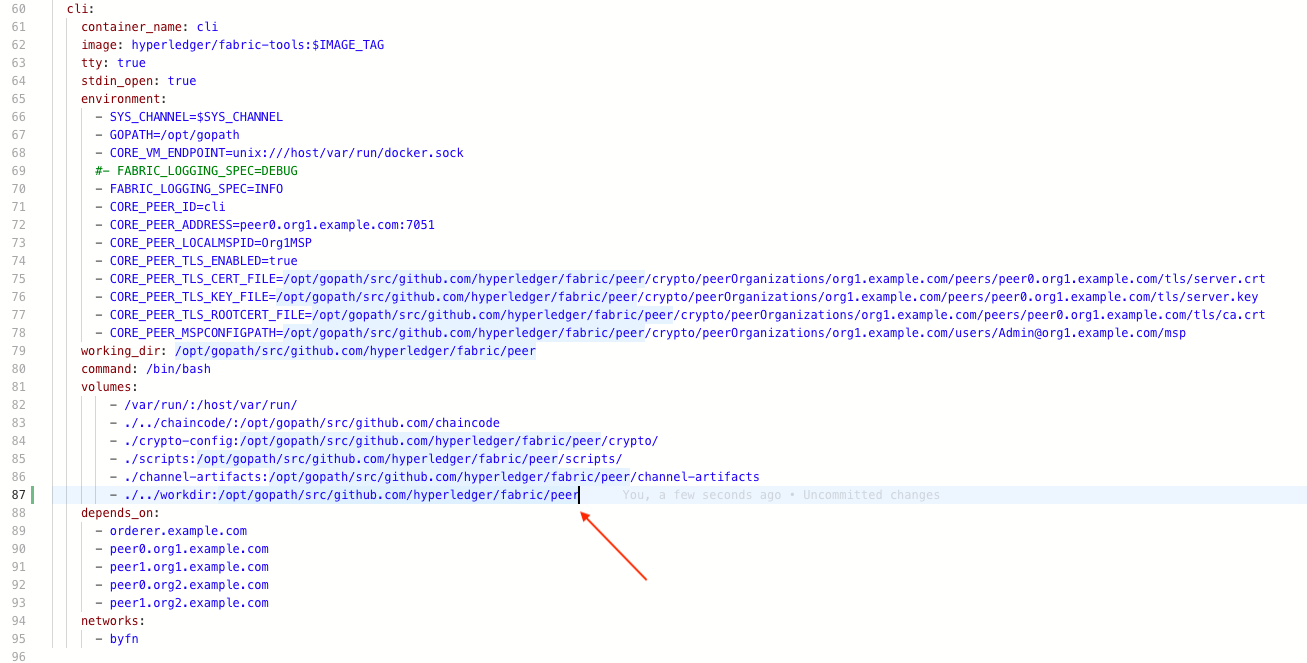
Add the string as below.
1 | - ./../workdir:/opt/gopath/src/github.com/hyperledger/fabric/peer |
After that, we may finally launch the network.
1 2 3 4 | cd first-network echo Y | bash byfn.sh -m generate -o kafka echo Y | bash byfn.sh -m up -o kafka |
Determine the amount of channels to modify
First, we need to know a system channel name. In the BYFN scenario, it’s called byfn-sys-channel, while the default name is testchainid, so we need to know what name exactly your network has. The easiest way to do it is to check orderer logs.
1 | docker logs orderer.example.com |
By running this command, you will get the output with the system channel name as highlighted in the screenshot below.
Remember this value, we will need it in the future.
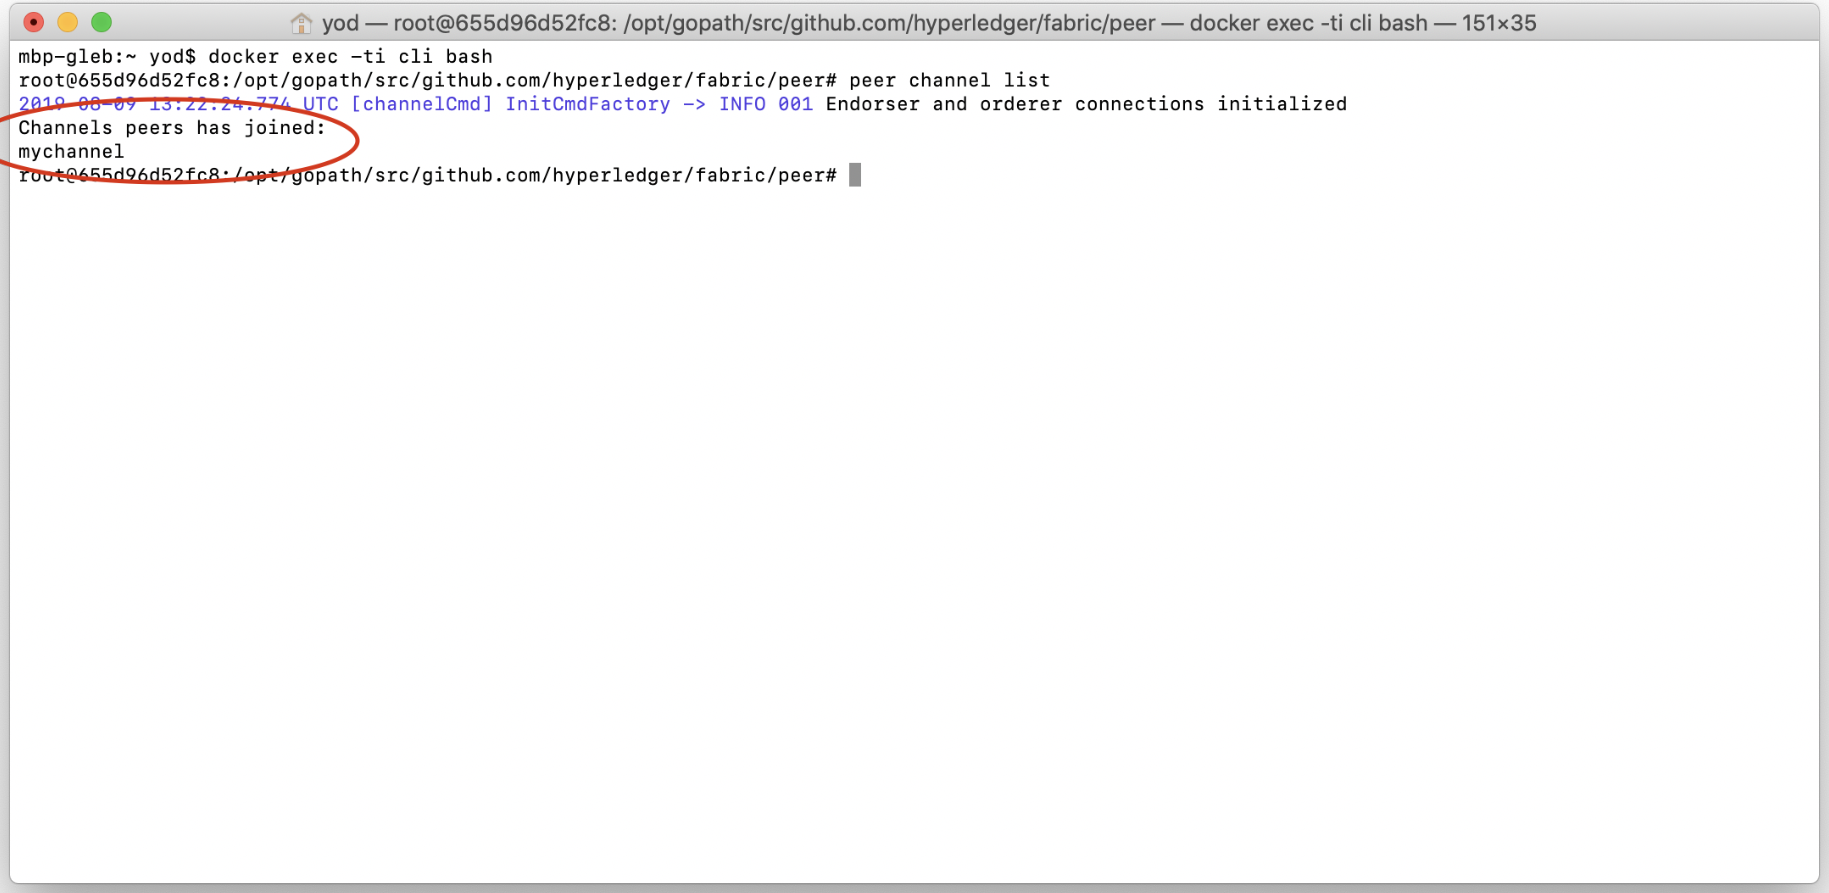
After that, we need a full list of channels inside your Hyperledger Fabric network. To obtain it, use the peer command in the CLI container. In our case, we will have only one additional channel to modify, it’s called mychannel.
1 2 3 4 5 | # Login to cli container docker exec -ti cli bash # Determine channel names, peer has joined. We will need to modify all of those channels plus a system one. peer channel list |
After running the command, you will get the following output.
Please be aware that the peer you’ll have credentials for may not be joined to all of the network channels. So, this may be performed multiple times with several different access rights and configurations.
Put the network into the maintenance mode
Make sure that you have logged into the CLI container. If not, log in with the following command.
1 | docker exec -ti cli bash |
In the next section, we will fetch configuration from our working channel called mychannel. Make sure that CHANNEL_NAME equals to your actual channel name we determined in the previous step.
1 2 3 4 5 6 7 8 9 10 11 12 13 14 15 | # export all needed env vars export ORDERER_CA=/opt/gopath/src/github.com/hyperledger/fabric/peer/crypto/ordererOrganizations/example.com/orderers/orderer.example.com/msp/tlscacerts/tlsca.example.com-cert.pem export CHANNEL_NAME=mychannel # make sure channel name is correct # change work directories mkdir maintenance_on_$CHANNEL_NAME && cd maintenance_on_$CHANNEL_NAME # fetch current channel config peer channel fetch config config_block.pb -o orderer.example.com:7050 -c $CHANNEL_NAME --tls --cafile $ORDERER_CA # decode fetched channel config configtxlator proto_decode --input config_block.pb --type common.Block | jq .data.data[0].payload.data.config > config.json # save old config, to calculate delta in the future cp config.json config_mod.json |
Next, we’ll need to determine how an orderer organization MSP (Membership Service Provider) is called. Usually, it is specified in configtx.yml and equals to OrdererMSP.
1 | cat config.json | grep name |
After running the command, we get the following output.
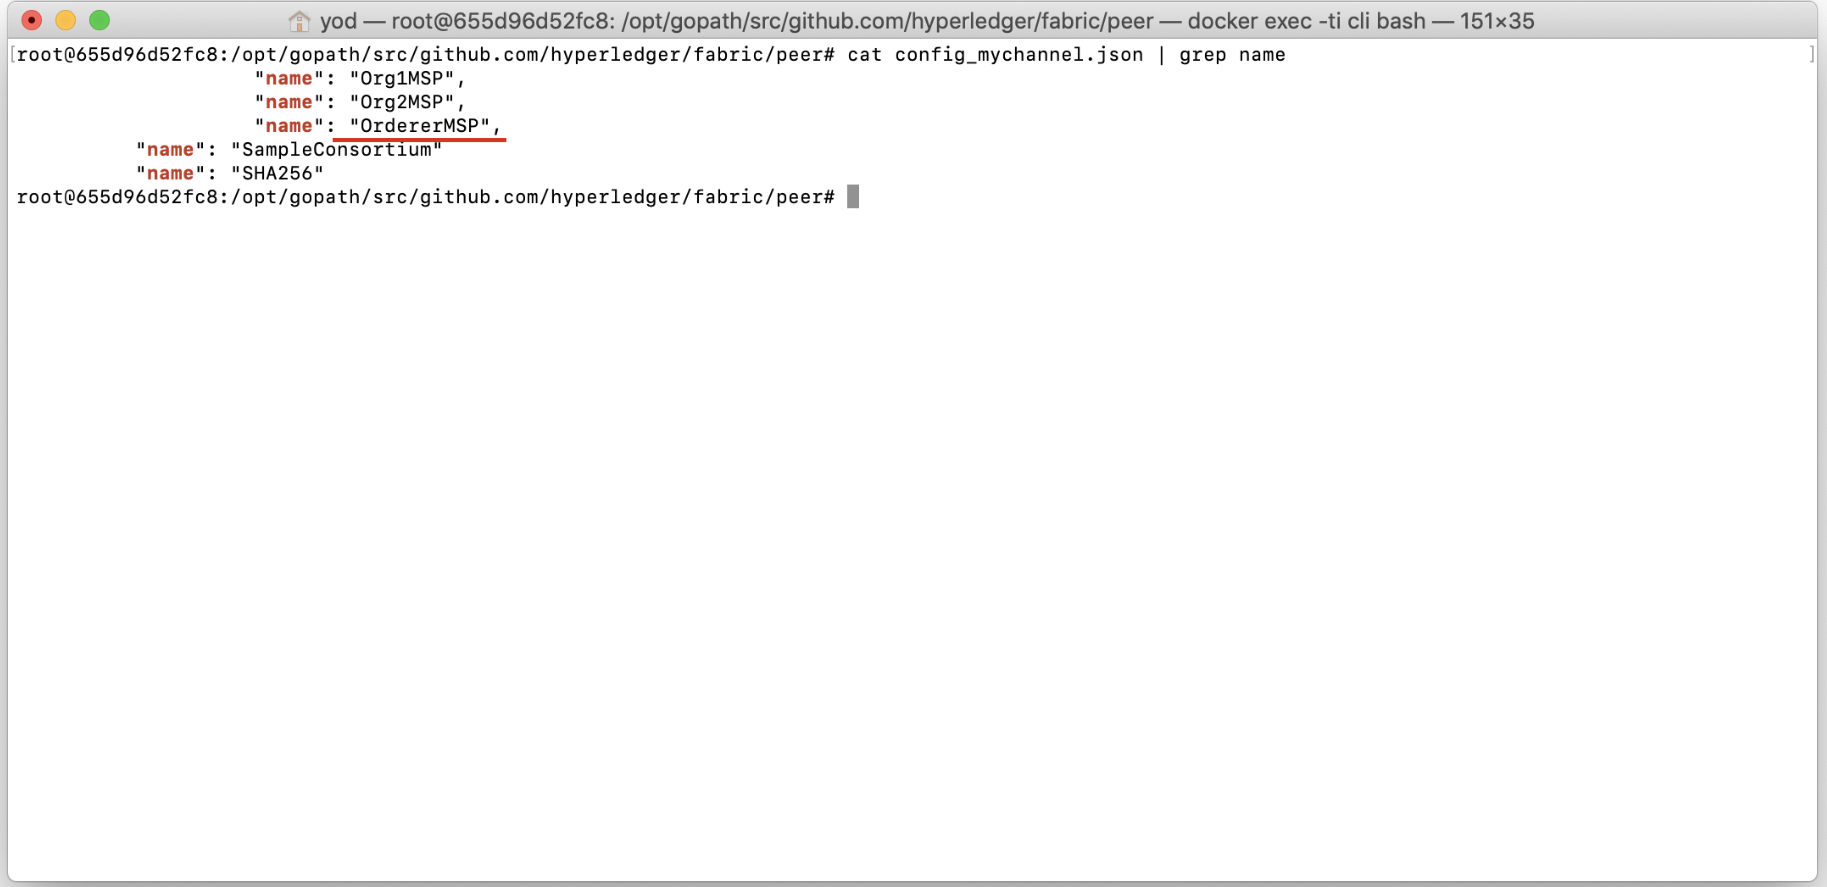
Remember this value, we will need it later.
Then, we need to modify channel configurations by putting them into the maintenance mode. Make sure that CORE_PEER_LOCALMSPID has the value you’ve obtained in the previous step, as well as channel_id points to the actual name of the channel we are modifying now.
1 2 3 4 5 6 7 8 9 10 11 12 13 14 15 16 17 18 19 20 21 22 23 24 25 26 27 28 29 30 31 32 | # set maintenance mode in configs sed -i 's/NORMAL/MAINTENANCE/g' config_mod.json # encode old config to protopuf configtxlator proto_encode --input config.json --type common.Config --output config.pb # encode new config to protopuf configtxlator proto_encode --input config_mod.json --type common.Config --output modified_config.pb # compute delta between configs configtxlator compute_update --channel_id $CHANNEL_NAME --original config.pb --updated modified_config.pb --output config_update.pb # decode delta config configtxlator proto_decode --input config_update.pb --type common.ConfigUpdate | jq . > config_update.json # wrap delta config with a header echo '{"payload":{"header":{"channel_header":{"channel_id":"mychannel", "type":2}},"data":{"config_update":'$(cat config_update.json)'}}}' | jq . > config_update_envelope.json # encode wrapped config to protopuf configtxlator proto_encode --input config_update_envelope.json --type common.Envelope --output config_update_in_envelope.pb # sign channel update config peer channel signconfigtx -f config_update_in_envelope.pb # export all needed env vars export CORE_PEER_LOCALMSPID="OrdererMSP" export CORE_PEER_TLS_ROOTCERT_FILE=/opt/gopath/src/github.com/hyperledger/fabric/peer/crypto/crypto/ordererOrganizations/example.com/orderers/orderer.example.com/tls/ca.crt export CORE_PEER_MSPCONFIGPATH=/opt/gopath/src/github.com/hyperledger/fabric/peer/crypto/ordererOrganizations/example.com/users/Admin@example.com/msp/ export CORE_PEER_ADDRESS=peer0.org1.example.com:7051 # submit new channel config peer channel update -f config_update_in_envelope.pb -c $CHANNEL_NAME -o orderer.example.com:7050 --tls --cafile $ORDERER_CA |
A successful channel update will look like shown below.

Repeat these steps for all of your channels.
Next, we need to put a system channel—in our case, it’s byfn-system-channel—to maintenance. The steps are pretty much the same, so, make sure all the channel names and orderer msp are configured correctly, which should be performed in the CLI container.
1 2 3 4 5 6 7 8 9 10 11 12 13 14 15 16 17 18 19 20 21 22 23 24 25 26 27 28 29 30 31 32 33 34 35 36 37 38 39 40 41 42 43 44 45 46 47 48 | # export all needed env vars export CHANNEL_NAME=byfn-sys-channel # change work directories cd .. mkdir maintenance_on_$CHANNEL_NAME && cd maintenance_on_$CHANNEL_NAME # fetch current channel config peer channel fetch config config_block.pb -o orderer.example.com:7050 -c $CHANNEL_NAME --tls --cafile $ORDERER_CA # decode fetched channel config configtxlator proto_decode --input config_block.pb --type common.Block | jq .data.data[0].payload.data.config > config.json # save old config, to calculate delta in the future cp config.json config_mod.json # set maintenance mode in configs sed -i 's/NORMAL/MAINTENANCE/g' config_mod.json # encode old config to protopuf configtxlator proto_encode --input config.json --type common.Config --output config.pb # encode new config to protopuf configtxlator proto_encode --input config_mod.json --type common.Config --output modified_config.pb # compute delta between configs configtxlator compute_update --channel_id $CHANNEL_NAME --original config.pb --updated modified_config.pb --output config_update.pb # decode delta config configtxlator proto_decode --input config_update.pb --type common.ConfigUpdate | jq . > config_update.json # wrap delta config with a header echo '{"payload":{"header":{"channel_header":{"channel_id":"byfn-sys-channel", "type":2}},"data":{"config_update":'$(cat config_update.json)'}}}' | jq . > config_update_envelope.json # encode wrapped config to protopuf configtxlator proto_encode --input config_update_envelope.json --type common.Envelope --output config_update_in_envelope.pb # sign channel update config peer channel signconfigtx -f config_update_in_envelope.pb # export all needed env vars export CORE_PEER_LOCALMSPID="OrdererMSP" export CORE_PEER_TLS_ROOTCERT_FILE=/opt/gopath/src/github.com/hyperledger/fabric/peer/crypto/crypto/ordererOrganizations/example.com/orderers/orderer.example.com/tls/ca.crt export CORE_PEER_MSPCONFIGPATH=/opt/gopath/src/github.com/hyperledger/fabric/peer/crypto/ordererOrganizations/example.com/users/Admin@example.com/msp/ export CORE_PEER_ADDRESS=peer0.org1.example.com:7051 # submit new channel config peer channel update -f config_update_in_envelope.pb -c $CHANNEL_NAME -o orderer.example.com:7050 --tls --cafile $ORDERER_CA |
After all the configuration updates were performed successfully, log out from the CLI container.
1 | exit |
Then, restart all the containers.
1 | docker restart $(docker ps -a | grep "hyperledger/fabric" | awk '{print $1}') |
Migrate, actually
Log in back to the CLI container.
1 | docker exec -ti cli bash |
Then, make sure that your code has the following properties:
export CHANNEL_NAME=mychannelexport CORE_PEER_LOCALMSPID="OrdererMSP"echo
'{"payload":{"header":{"channel_header":{"channel_id":"mychannel", "type":2}},"data":{"config_update":'$(cat config_update.json)'}}}' | jq . > config_update_envelope.json
Actually, those are the values we determined earlier. If everything is okey, you can start the migration.
1 2 3 4 5 6 7 8 9 10 11 12 13 14 15 16 17 18 19 | # export all needed env vars export ORDERER_CA=/opt/gopath/src/github.com/hyperledger/fabric/peer/crypto/ordererOrganizations/example.com/orderers/orderer.example.com/msp/tlscacerts/tlsca.example.com-cert.pem export CHANNEL_NAME=mychannel export CORE_PEER_LOCALMSPID="OrdererMSP" export CORE_PEER_TLS_ROOTCERT_FILE=/opt/gopath/src/github.com/hyperledger/fabric/peer/crypto/crypto/ordererOrganizations/example.com/orderers/orderer.example.com/tls/ca.crt export CORE_PEER_MSPCONFIGPATH=/opt/gopath/src/github.com/hyperledger/fabric/peer/crypto/ordererOrganizations/example.com/users/Admin@example.com/msp/ export CORE_PEER_ADDRESS=peer0.org1.example.com:7051 # change work directories mkdir switch_to_raft_${CHANNEL_NAME} && cd switch_to_raft_${CHANNEL_NAME} # fetch current channel config peer channel fetch config config_block.pb -o orderer.example.com:7050 -c $CHANNEL_NAME --tls --cafile $ORDERER_CA # decode fetched channel config configtxlator proto_decode --input config_block.pb --type common.Block | jq .data.data[0].payload.data.config > config.json # save old config, to calculate delta in the future cp config.json config_mod.json |
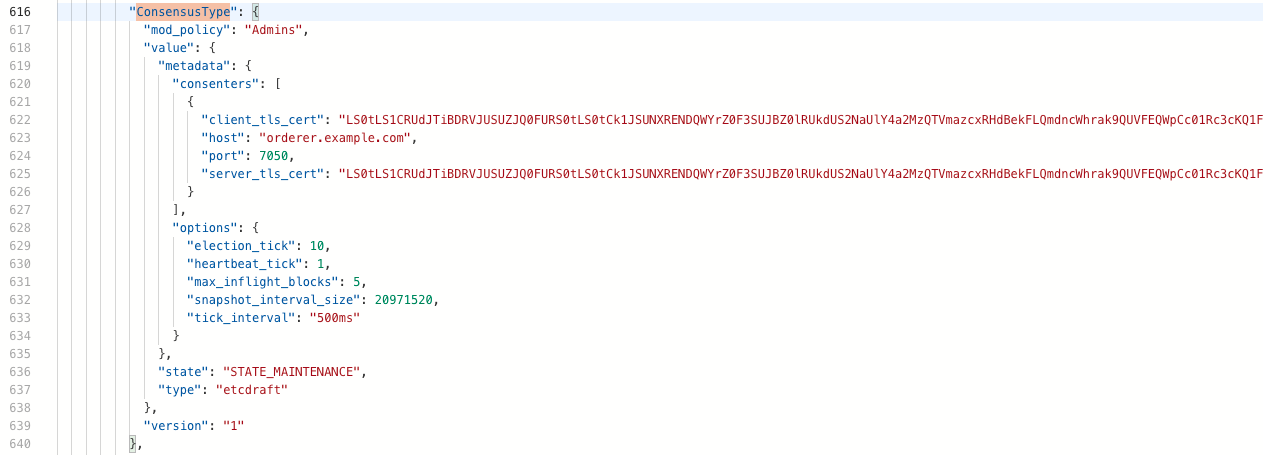
Open config_mod.json in the editor of choice. It should be located in the workdir/switch_to_raft_mychannel directory of your repository, as we mounted it earlier. Find the ConsensusType block. We need to modify the metadata and type fields to make them look similar to what is displayed below.
"ConsensusType": {
            "mod_policy": "Admins",
            "value": {
              "metadata": {
                "consenters": [
                  {
                    "client_tls_cert": "LS0tLS1<…>LS0tLQo=",
                    "host": "orderer.example.com",
                    "port": 7050,
                    "server_tls_cert": "LS0tLS1<...>tLQo="
                  }
                ],
                "options": {
                  "election_tick": 10,
                  "heartbeat_tick": 1,
                  "max_inflight_blocks": 5,
                  "snapshot_interval_size": 20971520,
                  "tick_interval": "500ms"
                }
              },
              "state": "STATE_MAINTENANCE",
              "type": "etcdraft"
            },
            "version": "1"
          }
The client_tls_cert and server_tls_cert fields are actually equal and should contain the base64-encoded orderer service certificate. You can obtain this value by executing the following command in the CLI container we’ve already opened.
1 | base64 /opt/gopath/src/github.com/hyperledger/fabric/peer/crypto/ordererOrganizations/example.com/orderers/orderer.example.com/tls/server.crt -w0 && echo "" |
After the modification is done, save the file and go back to your CLI container console. Check that you have a correct channel ID in these properties:
echo
 '{"payload":{"header":{"channel_header":{"channel_id":"mychannel", "type":2}},"data":{"config_update":'$(cat config_update.json)'}}}' | jq . > config_update_envelope.json
CORE_PEER_LOCALMSPID
The following command will perform a channel configuration update after encoding channel JSON configurations to the protobuf files.
1 2 3 4 5 6 7 8 9 10 11 12 13 14 15 16 17 18 19 20 21 22 23 24 25 26 27 28 | # encode old config to protopuf configtxlator proto_encode --input config.json --type common.Config --output config.pb # encode new config to protopuf configtxlator proto_encode --input config_mod.json --type common.Config --output modified_config.pb # compute delta between configs configtxlator compute_update --channel_id $CHANNEL_NAME --original config.pb --updated modified_config.pb --output config_update.pb # decode delta config configtxlator proto_decode --input config_update.pb --type common.ConfigUpdate | jq . > config_update.json # wrap delta config with a header echo '{"payload":{"header":{"channel_header":{"channel_id":"mychannel", "type":2}},"data":{"config_update":'$(cat config_update.json)'}}}' | jq . > config_update_envelope.json # encode wrapped config to protopuf configtxlator proto_encode --input config_update_envelope.json --type common.Envelope --output config_update_in_envelope.pb # sign channel update config peer channel signconfigtx -f config_update_in_envelope.pb # export all needed env vars export CORE_PEER_TLS_ROOTCERT_FILE=/opt/gopath/src/github.com/hyperledger/fabric/peer/crypto/crypto/ordererOrganizations/example.com/orderers/orderer.example.com/tls/ca.crt export CORE_PEER_MSPCONFIGPATH=/opt/gopath/src/github.com/hyperledger/fabric/peer/crypto/ordererOrganizations/example.com/users/Admin@example.com/msp/ export CORE_PEER_ADDRESS=peer0.org1.example.com:7051 # submit new channel config peer channel update -f config_update_in_envelope.pb -c $CHANNEL_NAME -o orderer.example.com:7050 --tls --cafile $ORDERER_CA |
Repeat these steps for all your channels. Next, we need to perform absolutely the same changes in our system channel.
1 2 3 4 5 6 7 8 9 10 11 12 13 | export CHANNEL_NAME=byfn-sys-channel cd .. # change work directories mkdir switch_to_raft_${CHANNEL_NAME} && cd switch_to_raft_${CHANNEL_NAME} # fetch current channel config peer channel fetch config config_block.pb -o orderer.example.com:7050 -c $CHANNEL_NAME --tls --cafile $ORDERER_CA # decode fetched channel config configtxlator proto_decode --input config_block.pb --type common.Block | jq .data.data[0].payload.data.config > config.json # save old config, to calculate delta in the future cp config.json config_mod.json |
Make sure to adjust config_mod.json as desplayed below.
Finally, perform the system channel upgrade, but don’t forget to check channel names and orderer msp.
1 2 3 4 5 6 7 8 9 10 11 12 13 14 15 16 17 18 19 20 21 22 23 24 25 26 27 28 29 | # encode old config to protopuf configtxlator proto_encode --input config.json --type common.Config --output config.pb # encode new config to protopuf configtxlator proto_encode --input config_mod.json --type common.Config --output modified_config.pb # compute delta between configs configtxlator compute_update --channel_id $CHANNEL_NAME --original config.pb --updated modified_config.pb --output config_update.pb # decode delta config configtxlator proto_decode --input config_update.pb --type common.ConfigUpdate | jq . > config_update.json # wrap delta config with a header echo '{"payload":{"header":{"channel_header":{"channel_id":"byfn-sys-channel", "type":2}},"data":{"config_update":'$(cat config_update.json)'}}}' | jq . > config_update_envelope.json # encode wrapped config to protopuf configtxlator proto_encode --input config_update_envelope.json --type common.Envelope --output config_update_in_envelope.pb # sign channel update config peer channel signconfigtx -f config_update_in_envelope.pb # export all needed env vars export CORE_PEER_LOCALMSPID="OrdererMSP" export CORE_PEER_TLS_ROOTCERT_FILE=/opt/gopath/src/github.com/hyperledger/fabric/peer/crypto/crypto/ordererOrganizations/example.com/orderers/orderer.example.com/tls/ca.crt export CORE_PEER_MSPCONFIGPATH=/opt/gopath/src/github.com/hyperledger/fabric/peer/crypto/ordererOrganizations/example.com/users/Admin@example.com/msp/ export CORE_PEER_ADDRESS=peer0.org1.example.com:7051 # submit new channel config peer channel update -f config_update_in_envelope.pb -c $CHANNEL_NAME -o orderer.example.com:7050 --tls --cafile $ORDERER_CA |
If everything has been done properly and you passed the step without any error, log out from the CLI container.
1 | exit |
Then, restart the network.
1 | docker restart $(docker ps -a | grep "hyperledger/fabric" | awk '{print $1}') |
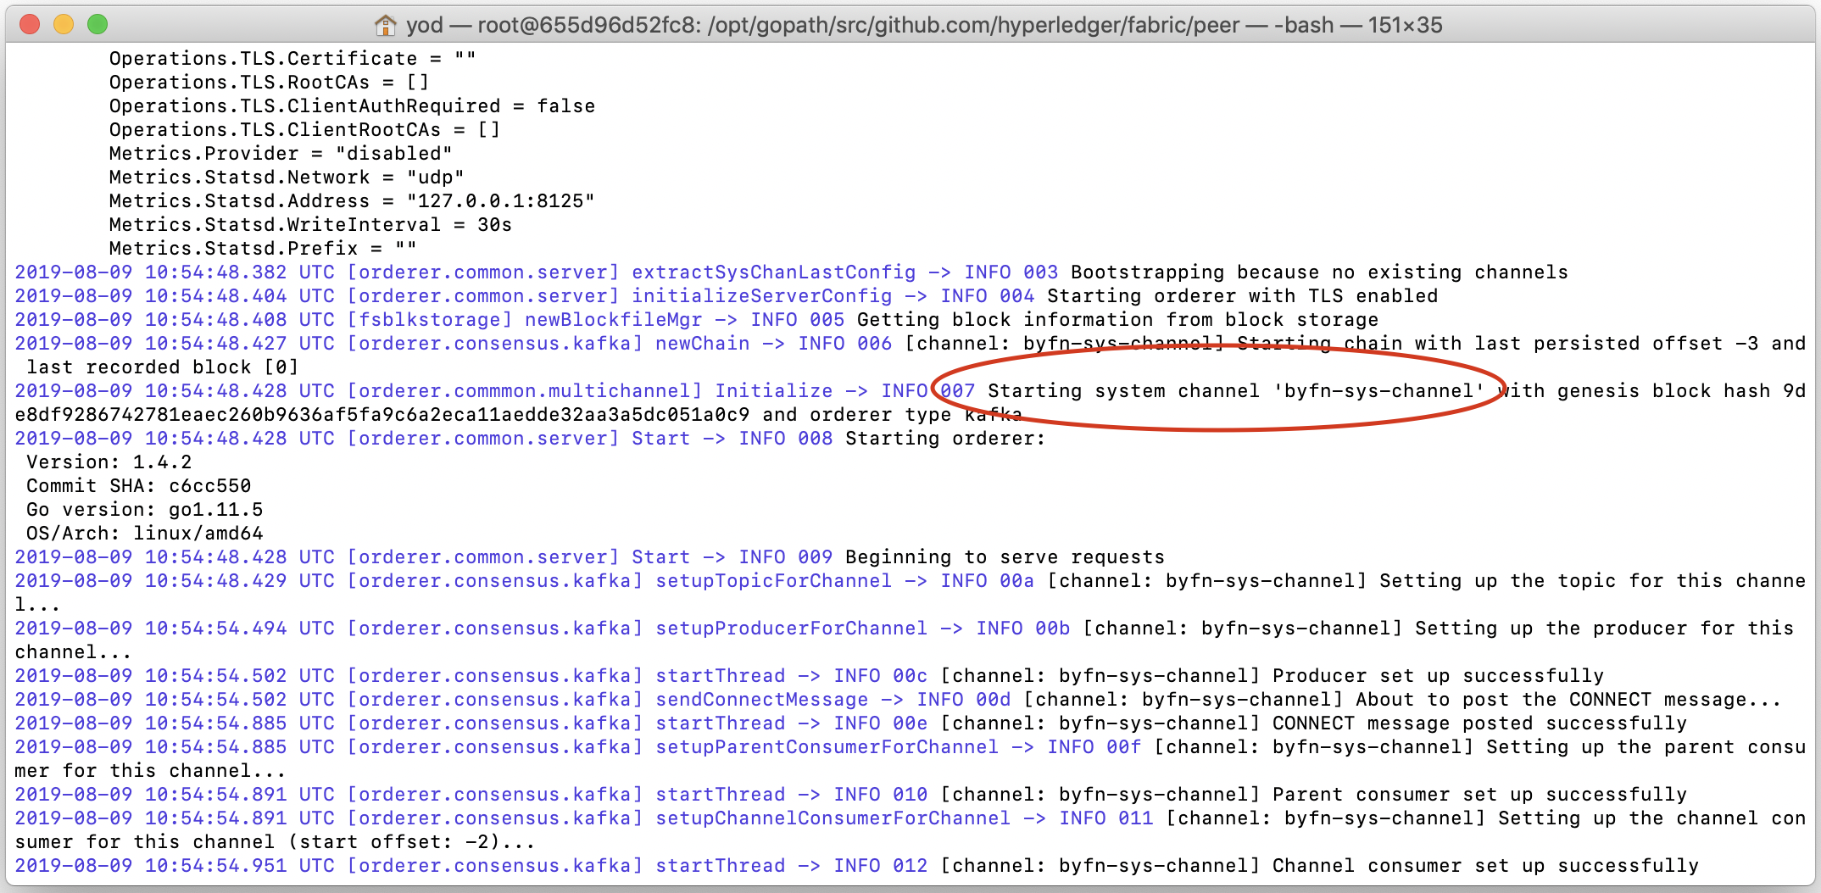
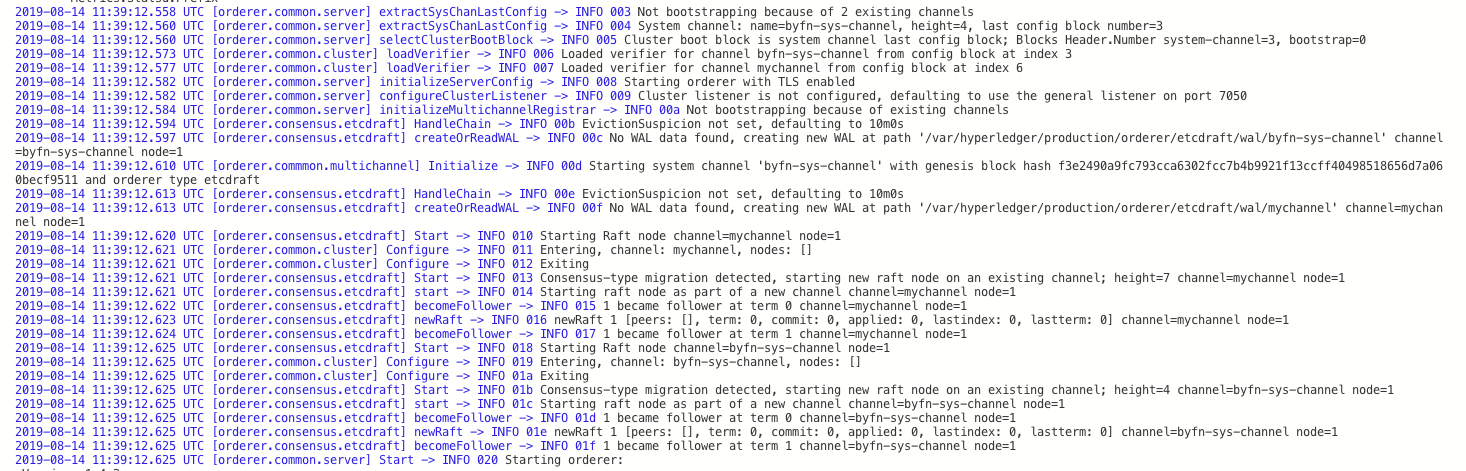
After 10–20 seconds, check orderer logs to understand whether migration was completed successfully—by running the following command.
1 | docker logs orderer.example.com |
Below, you can see the output provided by Docker logs.
Disable the maintenance mode
After migration is completed, we can disable the maintenance mode and get rid of the Kafka cluster. Run the following commands to disable the maintenance mode on the working channel, but, first make sure that channel names and orderer msp are specified correctly.
Log in to the CLI container.
1 | docker exec -ti cli bash |
Then, submit the channel update.
1 2 3 4 5 6 7 8 9 10 11 12 13 14 15 16 17 18 19 20 21 22 23 24 25 26 27 28 29 30 31 32 33 34 35 36 37 38 39 40 41 42 43 44 45 46 47 48 49 50 51 52 | # export all needed env vars export CORE_PEER_LOCALMSPID="OrdererMSP" export CORE_PEER_TLS_ROOTCERT_FILE=/opt/gopath/src/github.com/hyperledger/fabric/peer/crypto/crypto/ordererOrganizations/example.com/orderers/orderer.example.com/tls/ca.crt export CORE_PEER_MSPCONFIGPATH=/opt/gopath/src/github.com/hyperledger/fabric/peer/crypto/ordererOrganizations/example.com/users/Admin@example.com/msp/ export CORE_PEER_ADDRESS=peer0.org1.example.com:7051 export ORDERER_CA=/opt/gopath/src/github.com/hyperledger/fabric/peer/crypto/ordererOrganizations/example.com/orderers/orderer.example.com/msp/tlscacerts/tlsca.example.com-cert.pem export CHANNEL_NAME=mychannel # change working directory mkdir maintenance_off_$CHANNEL_NAME && cd maintenance_off_$CHANNEL_NAME # fetch current channel config peer channel fetch config config_block.pb -o orderer.example.com:7050 -c $CHANNEL_NAME --tls --cafile $ORDERER_CA # decode current config configtxlator proto_decode --input config_block.pb --type common.Block | jq .data.data[0].payload.data.config > config.json # save to perform changes in the configuration cp config.json config_mod.json # modify new config file sed -i 's/MAINTENANCE/NORMAL/g' config_mod.json # encode old config to protopuf configtxlator proto_encode --input config.json --type common.Config --output config.pb # encode new config to protopuf configtxlator proto_encode --input config_mod.json --type common.Config --output modified_config.pb # compute delta in configurations configtxlator compute_update --channel_id $CHANNEL_NAME --original config.pb --updated modified_config.pb --output config_update.pb # decode delta configtxlator proto_decode --input config_update.pb --type common.ConfigUpdate | jq . > config_update.json # wrap delta with header echo '{"payload":{"header":{"channel_header":{"channel_id":"mychannel", "type":2}},"data":{"config_update":'$(cat config_update.json)'}}}' | jq . > config_update_envelope.json # encode delta config configtxlator proto_encode --input config_update_envelope.json --type common.Envelope --output config_update_in_envelope.pb # sign config update transaction peer channel signconfigtx -f config_update_in_envelope.pb # export needed env vars export CORE_PEER_LOCALMSPID="OrdererMSP" export CORE_PEER_TLS_ROOTCERT_FILE=/opt/gopath/src/github.com/hyperledger/fabric/peer/crypto/crypto/ordererOrganizations/example.com/orderers/orderer.example.com/tls/ca.crt export CORE_PEER_MSPCONFIGPATH=/opt/gopath/src/github.com/hyperledger/fabric/peer/crypto/ordererOrganizations/example.com/users/Admin@example.com/msp/ export CORE_PEER_ADDRESS=peer0.org1.example.com:7051 # submit channel update peer channel update -f config_update_in_envelope.pb -c $CHANNEL_NAME -o orderer.example.com:7050 --tls --cafile $ORDERER_CA |
Repeat for all the channels. Next, we need to switch off the maintenance mode for the system channel.
1 2 3 4 5 6 7 8 9 10 11 12 13 14 15 16 17 18 19 20 21 22 23 24 25 26 27 28 29 30 31 32 33 34 35 36 37 38 39 40 41 42 43 44 45 46 47 | export CHANNEL_NAME=byfn-sys-channel cd .. # change working directories mkdir maintenance_on_$CHANNEL_NAME && cd maintenance_on_$CHANNEL_NAME # fetch current channel config peer channel fetch config config_block.pb -o orderer.example.com:7050 -c $CHANNEL_NAME --tls --cafile $ORDERER_CA # decode fetched config configtxlator proto_decode --input config_block.pb --type common.Block | jq .data.data[0].payload.data.config > config.json # save config for further modifications cp config.json config_mod.json # modify channel config sed -i 's/MAINTENANCE/NORMAL/g' config_mod.json # encode old channel config configtxlator proto_encode --input config.json --type common.Config --output config.pb # encode new channel config configtxlator proto_encode --input config_mod.json --type common.Config --output modified_config.pb # compute delta between configuration configtxlator compute_update --channel_id $CHANNEL_NAME --original config.pb --updated modified_config.pb --output config_update.pb # decode delta configtxlator proto_decode --input config_update.pb --type common.ConfigUpdate | jq . > config_update.json # wrap delta with header echo '{"payload":{"header":{"channel_header":{"channel_id":"byfn-sys-channel", "type":2}},"data":{"config_update":'$(cat config_update.json)'}}}' | jq . > config_update_envelope.json # encode wrapped delta configtxlator proto_encode --input config_update_envelope.json --type common.Envelope --output config_update_in_envelope.pb # sign peer channel update peer channel signconfigtx -f config_update_in_envelope.pb # export all needed env vars export CORE_PEER_LOCALMSPID="OrdererMSP" export CORE_PEER_TLS_ROOTCERT_FILE=/opt/gopath/src/github.com/hyperledger/fabric/peer/crypto/crypto/ordererOrganizations/example.com/orderers/orderer.example.com/tls/ca.crt export CORE_PEER_MSPCONFIGPATH=/opt/gopath/src/github.com/hyperledger/fabric/peer/crypto/ordererOrganizations/example.com/users/Admin@example.com/msp/ export CORE_PEER_ADDRESS=peer0.org1.example.com:7051 # submit new channel config peer channel update -f config_update_in_envelope.pb -c $CHANNEL_NAME -o orderer.example.com:7050 --tls --cafile $ORDERER_CA |
After that, log out from the CLI container.
1 | exit |
Then, restart the containers.
1 | docker restart $(docker ps -a | grep "hyperledger/fabric" | awk '{print $1}') |
Execute the chaincode
To test whether the network actually operates, you can execute the chaincode (mycc in our case) with the following commands.
Log in to the CLI container.
1 | docker exec -ti cli bash |
Then, finally, submit the channel update.
1 2 3 4 5 6 7 8 9 10 11 | # export env vars export ORDERER_CA=/opt/gopath/src/github.com/hyperledger/fabric/peer/crypto/ordererOrganizations/example.com/orderers/orderer.example.com/msp/tlscacerts/tlsca.example.com-cert.pem export CHANNEL_NAME=mychannel export PEER0_ORG1_CA=/opt/gopath/src/github.com/hyperledger/fabric/peer/crypto/peerOrganizations/org1.example.com/peers/peer0.org1.example.com/tls/ca.crt export PEER0_ORG2_CA=/opt/gopath/src/github.com/hyperledger/fabric/peer/crypto/peerOrganizations/org2.example.com/peers/peer0.org2.example.com/tls/ca.crt # invoke chaincode peer chaincode invoke -o orderer.example.com:7050 -C $CHANNEL_NAME -n mycc --peerAddresses peer0.org1.example.com:7051 --tlsRootCertFiles $PEER0_ORG1_CA --peerAddresses peer0.org2.example.com:9051 --tlsRootCertFiles $PEER0_ORG2_CA -c '{"Args":["invoke","a","b","10"]}' --tls --cafile $ORDERER_CA # query chaincode peer chaincode invoke -o orderer.example.com:7050 -C $CHANNEL_NAME -n mycc --peerAddresses peer0.org1.example.com:7051 --tlsRootCertFiles $PEER0_ORG1_CA --peerAddresses peer0.org2.example.com:9051 --tlsRootCertFiles $PEER0_ORG2_CA -c '{"Args":["query","a"]}' --tls --cafile $ORDERER_CA |
So, this is all for the process behind migration from Kafka-based consensus to a single-node Raft. To tune the ordering service and the amount of orderers, refer to the official guide. For the source code used in this tutorial, explore our GitHub repository.
Further reading
- Ansible Fabric Starter: Deploy Hyperledger Fabric to Multiple Instances
- Securing a Blockchain with a Noninteractive Zero-Knowledge Proof
- Deploying a Multi-Node Hyperledger Fabric Network in 5 Steps
About the author